Well spent time layout for Doodlebug Design

Monday, July 31, 2023

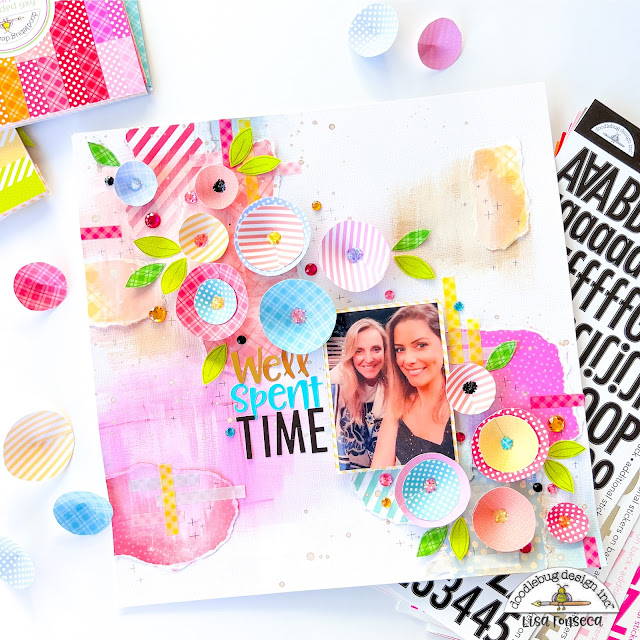
This week I have a fun layout for you, created with the wonderful Petite Prints. 

I was in the mood for an artsy, mixed-media layout, full of color.


To start, I cut out a lot of circles from different petite prints sheets. I mainly used, pink, dark pink, salmon, blue, mint and yellow. I cut them out from the new petite prints, Stripe-Sprinkles and Plaid-Polka Dots, and used both sides.


Then I placed them aside and created my mixed media background. 
To do that, I ripped random pieces off a few of the 12x12 petite prints papers and placed them on the layout, creating this "weird", random, whimsical composition. I adhered them to a sheet of white cardstock and then came in with some white gesso and a dry brush and created a few white spots here and there. I added some color and white gesso until I was happy and then I let it dry.


I then came in with a few strips of the thin plaid washi tapes. I added a few strips here and there and then also added a few crosses with my pencil. I also splattered some gold paint all over the page.

Then it was time to add the flowers. I added them in a diagonal kind of way and layered some of them.
I added the photo that I matted with a piece of patterned paper and placed it on the layout.

I also wanted to add a few green leaves, so I cut some out and adhered those too.


For the centers of the flowers, I addded a bit of liquid glue to each of them and then sprinkled Sugar Coating glitter on top. Love how that looks :)

I also added the title using Abigail and Skinny alphas.

To finish the layout, I added some jewels.


I really think it turned out pretty cool... ;)

Thank you for stopping by, see you.


Youtube / Facebook / Instagram


Doodlebug products:


Petite Prints Stripe/Sprinkles and Plaid/Polka-Dot

Big jewels

Sugar Coating

Plaid Washi Tape

Alpha Stickers in  Abigail and Skinny


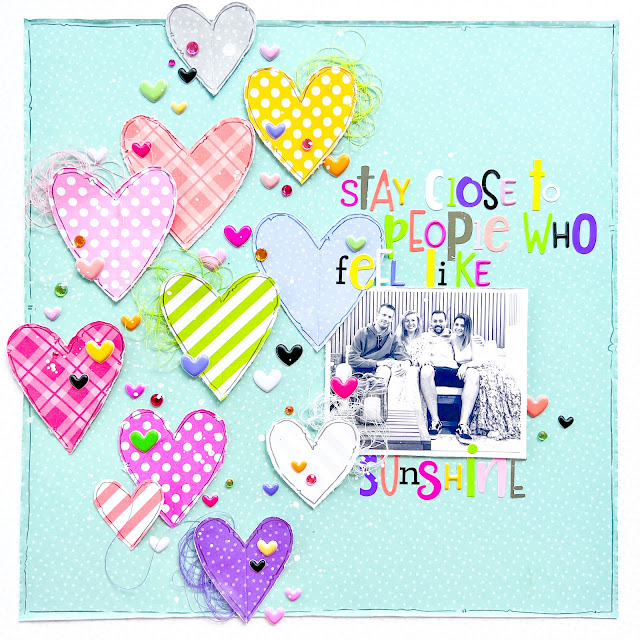
Flower cards for Doodlebug Design

Sunday, July 16, 2023

I love Doodlebug's rainbow colors and the new Petite Prints are just so versatile and easy to use. Love it!! Today I decided to create some flowers using the new patterned papers and the dies that were part of the Pretty Kitty collection.


The dies are a bunch of different sized and different shaped flowers, some leaves, a bird and a sentiment. I cut (almost) everything out from 9 different colors of the new Petite Prints, Candy-stripe/Sprinkles and Plaid/Polka Dot. Then I assembled the flowers, layering them the way I liked. 


I gave the birds a cute face and a tiny flower on the head. The sentiment, I cut out of a sheet of the Sprinkle Petite Print in black. 
To make all the flowers even cuter, I used jewels and mini jewels from my Doodlebug stash.

Then I created the card bases using a pink-redish and a peachy color. I cut out rectangles of 6x8inches and folded them to have 3x8 inches cards. As a background for the flowers, I wanted white, so I used the Sprinkle Petite Prints in white and cut out rectangles that were slightly smaller than 3x8 inches. I adhered them to the base using foam tape.


Then I arranged the flowers, and the other elements, on top and adhered them, when I felt happy with the result. 

I love these cute cards and you can use them for whatever you want if you just change the sentiment :)


Thank you so much for stopping by and see you soon.
Have fun creating!!! :)

Youtube / Facebook / Instagram


Doodlebug products used:


Petite Prints:

Candy-stripe/Sprinkles, Plaid/Polka Dot
Jewels
Mini Jewels
Pretty Kitty flower die cuts


Layout using new Petite Prints from Doodlebug Design

Monday, July 3, 2023

Awwww.... I just love a cute basic patterned paper and I love it even more, having this paper in a TON of beautiful colors. We got the new Petite prints in 12x12 and 6x6 and I have to say... JUST BEAUTIFUL!! I was very excited to use them for this layout. I chose a wonderful teal/mint color for my background as this color was just too pretty to use in small amounts... :)

I went through all of the colors of the rainbow, chose one patterned paper for each and cut out a heart from each of those. I distressed all of them with my scissors.
Then I placed them all on my paper and chose a fun way to display them. Some of them are overlapping, which gives it even more interest. I adhered the hearts using liquid glue and foam tape.


Then I matted the photo on a piece of patterned paper, distressed the edges and I added it to the layout.

For the title, I wanted to have it super colorful and whimsical, so I grabbed all of my alpha stickers and used letters from all the different styles. 


I then took colored thread and added some little nests behind some of the hearts. It just adds even more color and I love the effect on this layout.
Since this layout is pretty simple, I wanted to add another extra. So I trimmed the mint sheet of paper on each side (around 1/2inch) and then adhered it to a white patterned paper of the same style.
I distressed the edges, bended them up slightly and drew a scribbly border all around.


I also drew borders on all of the hearts. 
Then I used the puffy hearts and jewels and added a bunch of those.

LOOOOOVE all of the pretty colors on this layout.

Go get yourself some basic petite prints now, I'm sure you desperately need those in your stash...:)

See you soon,

Youtube / Facebook / Instagram


Doodlebug products used:


12x12 Petite Prints:

CANDY STRIPE-SPRINKLES

PLAID-POLKA DOT

Jewels

Puffy Hearts

Alpha Stickers:

SUNSHINE

ABIGAIL

ALPHABET SOUP

MY TYPE

SKINNY


Fur Baby layout for Doodlebug Design

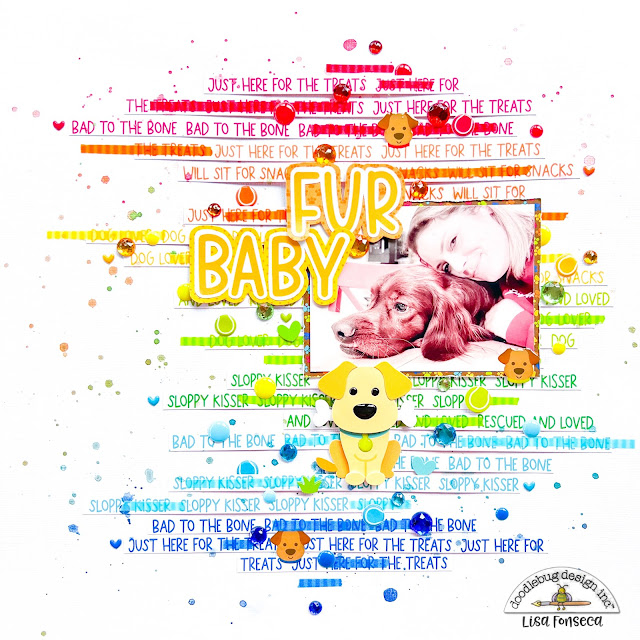
I love a good striped layout. Do you? I've made a ton of layouts with stripes and I really like the way they usually turn out. Here's the stripy layout, I created with Doodlebug's Doggone Cute collection.


One of the patterned papers from the collection has these words and phrases in rainbow colors. I really wanted to cut this paper apart, creating a bunch of colorful stripes. 
What I did is cut 2 stripes of each color and then cut each of those into 2 pieces, creating smaller stripes in different sizes. 


I then placed the stripes one under the other, keeping the rainbow pattern and using 3 or 4 stripes of each color. I like placing the stripes in a random looking kind of way, where some are shorter, some longer, some peek out from the one side, some from the other. Even though there's no rhyme or reason to the placement, it still looks coherent and organized.


I then matted the photo on a brown patterned paper to come back with the color of the dog in the photo. I adhered it to the layout and then chose a title.
I went with a sentiment from the Chit Chat die cut pack. I cut the white border a bit narrower and then adhered the pieces to a yellow and orange patterned paper. I cut them out and adhered them to the layout using foam tape.

I used one of the Doodle Pops and adhered it under the photo and also used three small dog head enamel dots.


I was already done and ready to place the final embellishments, when I thought that the layout was, though very pretty, a bit too white. So I went to grab a tube with striped rainbow colored washi tapes. I took a stripe of each color and cut it in the middle and then adhered the pieces on top of the word stripes. I love the effect it gave, adding more color but still showing the letters underneath. Super pretty! :)

To finish, I added puffy tennis balls, jewels and enamel dots in the matching colors and paint splatters.

That's it friends, I hope you like the layout

See you soon.


Youtube / Facebook / Instagram


Doodlebug products used:

Doggone Cute collection

Washi tape stripe assortment


Other products used:

Watercolors


Latest Instagrams

© Lisa Fonseca. Design by FCD.