Wednesday, April 20, 2022

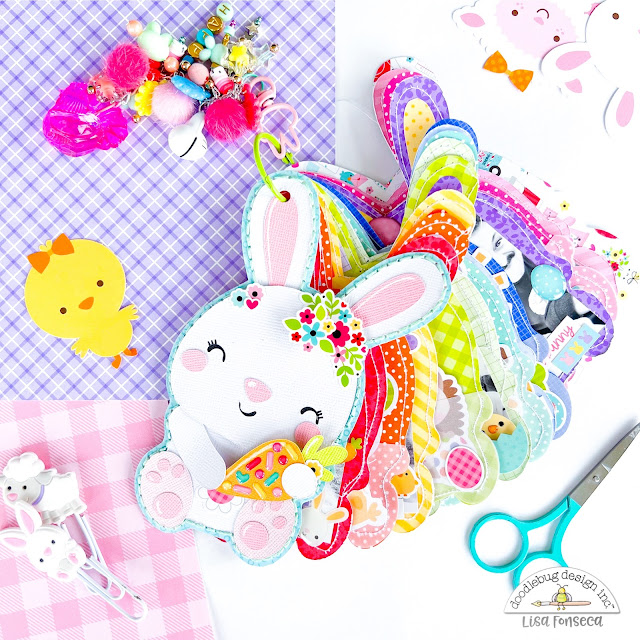
Ohhhh, how I love to make Easter projects!!! Heheeeee, always so cute and fun! This week, I decided to make a bunny-mini-album in rainbow colors... :)


Before deciding what I was going to do, I checked out all my Doodlebug cutfiles. I saw this fun little bunny and first thought of making a layout... but then I changed my mind and decided to make a mini album. Since I have a lot of 12x12 patterned papers from Doodlebug, with cool patterns and in all of the rainbow colors (called Petite Prints), I wanted to use rainbow colors for my pages. 


So I chose all of my papers and then used them with my Silhouette Cameo to cut out the shapes. The cover is made from the bunny cutfile with all of the tiny pieces to make the bunny. For the pages, I only cut out the outline of the bunny. To give a bit of interest to the pages, I created little pockets out of vellum, I also machine-stitched around all of the pages and I distressed the edges a bit.


On the cover, I hand-stitched all around the bunny, I love how that looks. :) I also added enamel sprinkles to the carrot, flower stickers to the bunny's head and a flower sticker to its belly. The flowers are from the Lots of Love collection. 

Then came the fun part of going from page to page and adhering photos and all kinds of embellishments. I used stickers, enamel shapes, Doodlepops and Chit Chat die cuts from last year's Easter collection called Hippity Hoppity. 

Take a look at the pages.


I put die cuts in my little vellum pockets, but of course, you can also put photos in there or hide little notes behind the die cuts. :) 

I also needed a charm tassel... I created this one in my last workshop with my girls... :) love the pink chicken...:)

This project was great to showcase the amazingly beautiful patterned papers of the Petite Prints collections. The colors are so vibrant and the patterns so fun. LOOOOOVE! :) 
Oh, I almost forgot... did you see that I also used the paper to put a bit of color in all of the bunnies ears? Heheee, cute right?

Hope you like my little mini and I wish everyone a wonderful Easter Day! 


Facebook
 Instagram YouTube


Doodlebug products:

Hippity Hoppity collection

Floral stickers from Lots of Love

Petite Prints:

6087 Ladybug Floral-Graph

5058 Mandarin Swiss Dot

6117 Lemon Dot-Stripe

5433 Citrus Gingham-Linen

6095 Limeade Floral-Graph

5065 Pistachio Swiss-Dot

6123 Bubbleblue Dot-Stripe

5439 Blue Jean Gingham-Linen

6101 Orchid Floral-Graph

5053 Bubblegum Swiss Dot

6108 Cupcake Dot-Stripe

Cutfile: D-353139


Other products used:

Charm tassel

Embroidery thread in teal

Binder ring in teal

Vellum


Springy Feelings Layout for Doodlebug Design

Tuesday, April 5, 2022

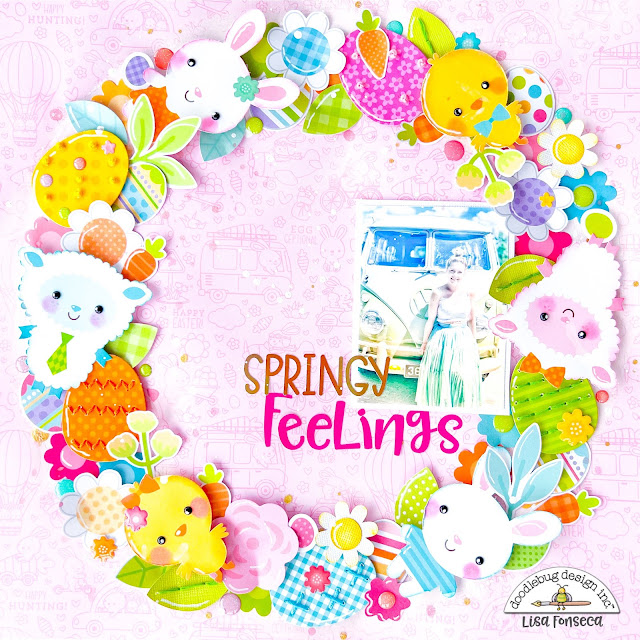
It's that time of the year again... no, not Christmas... Easter :) I love decorating with bunnies and sheep and chicks and using pastel colors everywhere. So to start with my Easter layouts, I went with the Easter collection from last year, called Hippity Hoppity and I mixed in a few little embellishments from other collections and from the basics.


A wreath design is always a good choice when you want to use a ton of embellishments. This layout came together pretty fast, since I only needed to find the embellishments that I wanted to use and basically create a circle with those. 

I mainly used stickers and die cuts from the Hippity Hoppity collection. I decided to give the eggs and little characters more dimension and interest to make them stand out more. So for the eggs, I stitched some patterns into them, using embroidery thread. For the little characters, I used my Distress Oxides to give them cheeks and a colored border. 


I also distressed the edges of the characters, I just love that effect. To start with the wreath, I placed the big eggs and characters on my prepped patterned paper, first. You always want to start with the bigger embellishments and then going smaller and smaller. I adhered them to the page using foam squares and foam tape.


Then I started placing my middle-sized things. Like smaller eggs, flowers and leaves. I tried to fill the circle more and more, being careful to create a perfect shape. Then came the small embellies, like mini eggs, tiny flowers etc. just before adding the final touches, the enamel dots.


When placing the super small objects, try to fill in any gaps that remain and to keep a perfect circle. 
I also used the enamel dots in the center of the flowers, to decorate some eggs and I used tiny black ones on the eyes of the characters. 

For my title, I went super simple. I used the Abigail and Sunshine alpha stickers.


I love creating wreaths, they are super fun to make and as I said, you can use a ton of embellishments, which I really love! I hope you were inspired to start your Easter projects too. I look forward to the new spring collections from Doodlebug, I can't wait. :)

See you soon...


Facebook
 Instagram YouTube


Doodlebug products used:


Hippitiy Hoppity collection

Abigail stickers

Sunshine stickers

Black enamel dots

Floral die cuts from Lots of Love


Other products used:


Embroidery thread

Gesso

Distress Oxides


Latest Instagrams

© Lisa Fonseca. Design by FCD.