Candy Cane Lane layout for Doodlebug

Sunday, December 25, 2022

One of my favorite designs when making layouts, is a grid design. It's been quite a while since I made one, but I made a project two weeks ago, for a grid design challenge I will host, and it was so much fun that I also wanted to make one with the cute Candy Cane Lane collection.


I made this layout, after already making another one that I didn't like at all... Does that happen to you? :) Well, it happens to me sometimes... But this time, it was no problem at all, since I already had the grid design idea that I wanted to make.

So I started by ripping 3x3 squares out of the 6x6 paper pad and 12x12 sheets of patterned papers, using a ruler. I like distressed edges and it's faster to rip the paper, than to cut it and then distress it after... hehe. 
For the square with the Santa on a bike, I used my pink Distress Oxide, to create a frame so that it would stand out more in front of the white background.

I adhered my squares to some vellum, using foam tape and then I ripped the vellum, leaving a narrow vellum border around all my squares.


I adhered them to a 12x12 sheet of white cardstock and then I chose my photo. I matted the photo with some pieces of patterned paper that I also distressed.
The photo is from a few years ago, when my friends and I took some photos for New Years' 2019. It's not a Christmas photo but it matched so good colorwise, that I wanted to use it... and it's just a week after Christmas, soooo still working, right? :)


I chose some die cuts from the Odds&Ends pack, the word "memories" from the Chit&Chat pack and the cute Doodle-pops deer and bird to decorate my page. 


For the title, I added "Winter" to "Memories" with the new Alphabet Soup puffy alpha stickers. Love those!!! :) 

I also had some circles with thread, left from the layout that I didn't like, and I repurposed those into flowers (yes, I took the other layout apart... shhh!!!) I added a circle on top, used an enamel dot in the center and added dimension and texture by pushing the center down.

Then I cut out leaves from a green tag and added those too.


Added some enamel dots and hearts and gold splatters to finish and voilà, all done! :)

I hope you like the layout and thank you for stopping by!


Youtube / Facebook / Instagram


Doodlebug products used:


Candy Cane Lane collection

Alphabet soup stickers


Other products used:


Thread

Vellum


Gift boxes for Doodlebug Design

Tuesday, December 13, 2022

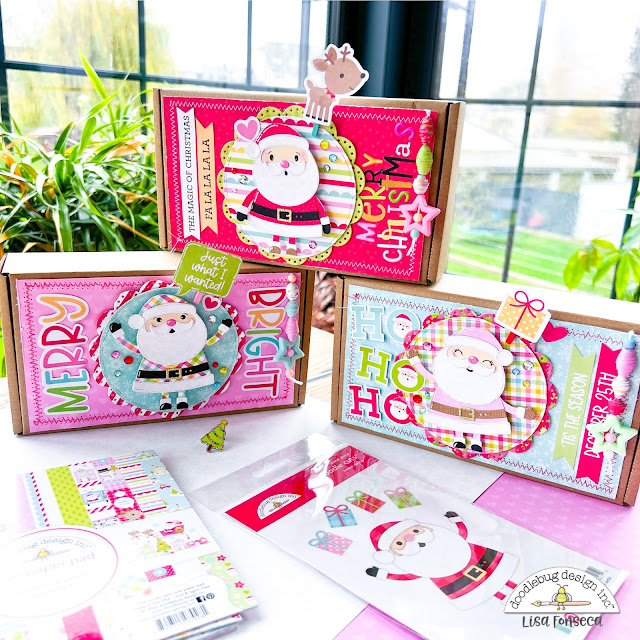
It's almost Christmas time guys and so it's time to start looking for little gifts... If you are creating some of your presents yourself or want to present your gifts in a super cute way, I have an idea for you. I decorated fun little boxes with the adorable new Santa dies from the Candy Cane Lane collection.


Like I said, in previous posts, I just love the new stackable dies. With these CANDY CANE LANE ones, you can create a little Santa in each and every color you want to.

So to start, I chose the papers I wanted to use. I didn't want to only create red Santas, so I also chose a pink heart patterned paper and a colorful gingham pattern.


Since I also wanted to change up his face a bit, I cut out the face, using the corresponding die, only once and for the other ones, I just traced the outlines, so that I could draw on my face later. 

For the shoes, belt and mittens, I used black and brown and for the belt buckle, I used gold glitter paper. When I paper pieced everything together, I also changed up the arms. For the red Santa, I cut both of them off and adhered them with the arms looking down. For the pink one, I adhered one of the arms a bit lower. 


As you can see from my three characters, even if you only have one die set, you can create a lot of different ones... :)

After adding details, like cheeks, eyes, mouth, white highlights and scribbly lines on the white parts, I adhered my Santas on two circles. A normal one and a scalloped one.
Then I adhered them to a rectangle, that fitted the cover of my box and that I had zigzag-stitched before.


I then decorated a bit more, using die cut pieces from the Chit Chat and Odds&Ends packs and some jewels. 


I also adhered three die cut pieces to wood clips and added those to my designs.


To make the box even more fun, I created tassels, with paper beads, that I made myself, and plastic beads. 

I really love the little boxes and can't wait to gift them to someone.


...Not with the things on this photo though... those are mine... :) Hahahaaa.. 

I hope you enjoyed this little idea and are ready to start crafting.

Wish you a wonderful week...

Youtube / Facebook / Instagram


Doodlebug Products used:


Candy Cane Lane collection

Cardstock

Wood pins

NEW Alphabet Soup puffy stickers

My Type alpha stickers

Sunshine alpha stickers

Abigail alpha stickers


Other products used:


Gold glitter paper

Beads

Embroidery Thread

Kraft boxes


Latest Instagrams

© Lisa Fonseca. Design by FCD.