
Happy Days layout for Doodlebug Design
Friday, May 28, 2021

Do you like making grid design layouts... ? I don't know if it's something for everyone, but I LOVE them and it's been quite some time, since I made one, so I really enjoyed making this layout.

What I love about grid designs, is that they are so easy and they come together super fast, plus, they always turn out fun.
For my layout, I started by choosing the patterned papers that I wanted to use. I used the Fairy Garden collection for this layout which has amazingly cute papers. I chose four that have a white background and colorful pattern and then five that only have one color. I backed them with white paper and distressed the edges. Then I backed them with white paper once more but used foam tape this time, to make them pop and to create some shadows. I distressed the edges again to make the whole thing more fun and interesting.

I adhered my nine squares to a blue patterned paper with clouds that I had splattered with white paint just before.
I used a photo of me and my girlfriends, matted it on white, then colorful patterned paper and adhered it to the layout.
Then I went through all of the embellishments from the collection and spent some time choosing and deciding what I wanted to do and where I wanted to place everything.

I kind of did a vertical design by leaving the upper right and bottom left corner a bit more empty. Just those two blank spots help the whole layout seem less overcrowded and give the eyes a place to rest. For the rest, I used die-cut pieces, enamel shapes, enamel dots and jewels. I also used a Doodle Pop rainbow with clouds, love it!!
I adhered some of the embellishments with liquid glue, directly onto the paper, and other ones I adhered using foam squares. I love it when the layout has different dimensions and has those shadows you create when you use dimensional adhesives.

I love the word die-cuts from Doodlebug. There's always a word you can use for your title. I love to pair those with alpha stickers in different fonts.

That was it guys,
hope you enjoyed it and see you very soon!
Doodlebug products used:
Fairy Garden collection
6x6 paper pad Dots&Stripes
6x6 paper pad Floral&Graph
Other products used:
White cardstock
White paint pen
This Beautiful Place layout for DOODLEBUG DESIGN
Friday, May 14, 2021
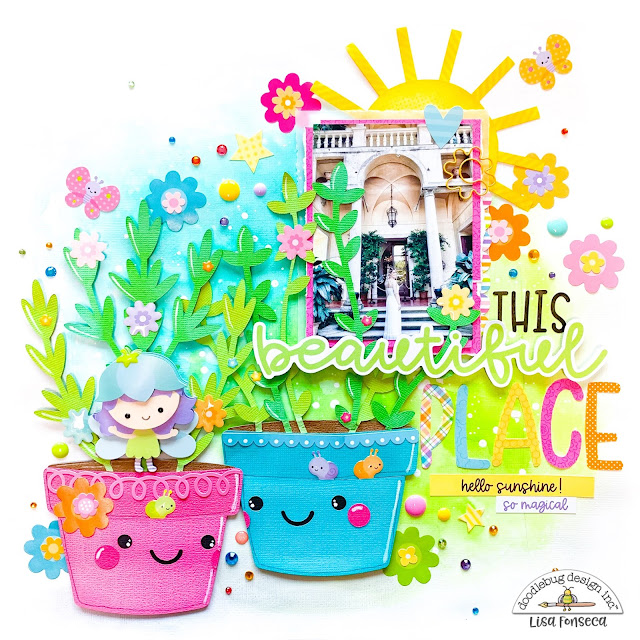
Are you already enjoying springy sunny weather where you live? Well I can honestly tell you that I will go crazy if spring doesn't start soon here in Luxembourg... :) That's why I love creating super bright and sunny layouts, so I can look at them, rather to look outside my windows... LOL!!

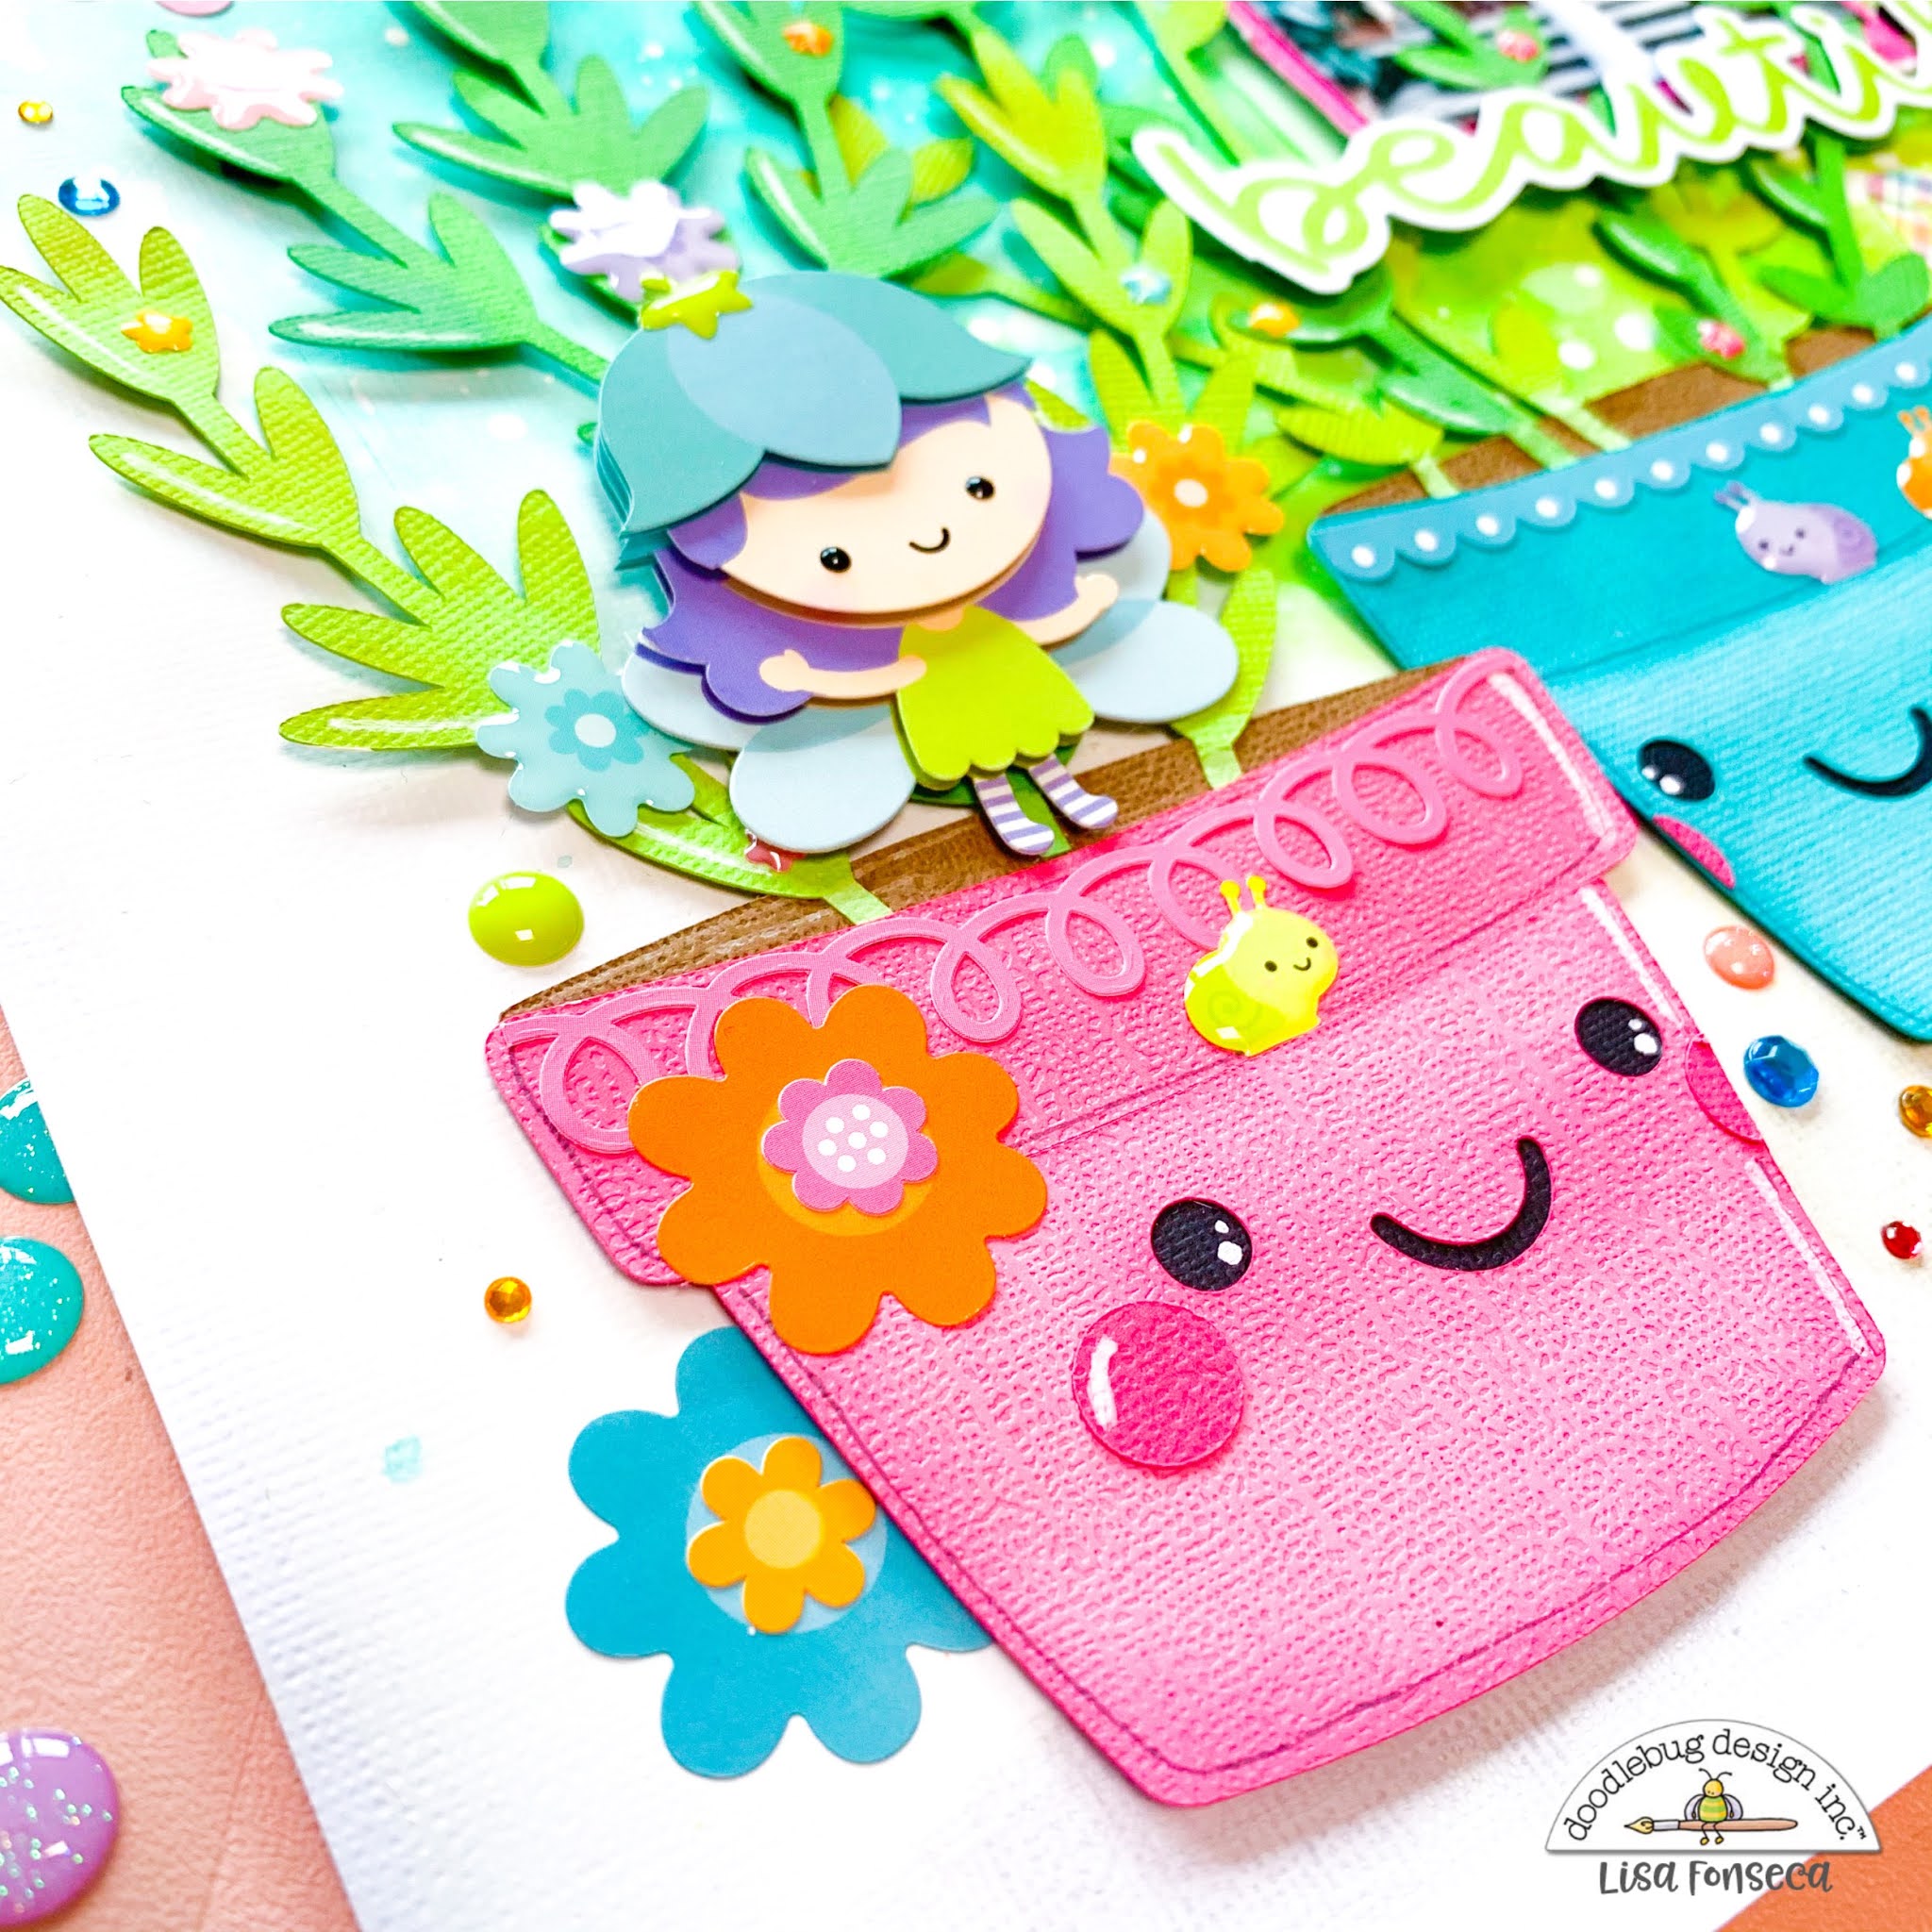
For this layout, I absolutely wanted to use a cute Doodlebug cutfile. I went through the cutfiles in the shop and found these cute planters. I cut them out, using Doodlebug cardstock in pink, blue, some brown and two different shades of green. I adhered all the pieces together after shading them a bit, using a dauber and my Distress Oxides.
For my background, I did a bit of mixed media, by prepping my page with gesso and then using acrylics and acrylic inks and a lot of water. I decided to go with bright green and teal colors for the background and when everything was dry, I added white splatters with my Montana marker... of course... :)

When my background was ready, I took my two plants and put them on my page just to see where exactly I wanted to place them. I adhered them using foam tape and little foam squares to create dimension and shadows on my layout.
I used a photo I took two years ago, when I was on vacation in Italy and we visited Isola Bella. I think that photo matches the vibe of the layout perfectly... magical, springy and like a fairytale... haha. I matted the photo on pink patterned paper and then some vellum and adhered it to the layout, letting some of the leaves of the plants overlap it.

Then came the best part: embellishing! For my title, I used some alpha letters in black, the die-cut piece saying "beautiful" and I hand-cut the letters to write "place" from different patterned papers from the collection.
I used flower stickers from the sticker roll, enamel shapes and dots and jewels... Can't have enough of those!! I also cut hand-cut out a sun from yellow paper to place behind my photo and fill up a bit of the white space on the upper part of the layout.
I LOVE the cute little snails on the planters... so ADORABLE! To finish, I placed a Doodle Pops fairy on one of the planters, which was the perfect final touch.

I hope you like the layout and are inspired to create something springy and happy, using a ton of Doodlebug embellishments! :)
Thx so much for stopping by, see you soon,
Lisa

Doodlebug products used:
Fairy Garden collection
Cutfile Plant - So much pun
Cardstock in pink, blue, brown and green
6x6 paper pad Stripes&Dots
Othe products:
Vellum
Silhouette Cameo
Acrylic Inks
Acrylics
Gesso
White cardstock sheet
Distress Oxides
Hello Spring layout for Doodlebug Design
Saturday, May 1, 2021

I don't know about you all, but I love the new Fairy Garden collection. It's perfect to document your Easter and spring photos but it really can be used for anything at all, as long as you want to create something bright and fun and happy... ;)
Here's my first layout created with this pretty collection,

When I first got the collection, the big die cut flowers immediately jumped to my eyes. I knew I wanted to assemble them, hand-stitch them and use them as big embellishments on my page. So I did! :)
I love the size of them, they are big but not too big and they have the perfect flower shapes and colors.

I needed a cool background for my fun flowers, so I thought it would be fun to create a kind of weaved pattern, like a weaved basket, to put my flowers onto. I cut approximately 1/2 and 1/4 inch stripes from a lot of patterned papers and then ripped them in two to have smaller pieces. Then I weaved them together and adhered them in two opposite corners.

Then I wanted to make it more distressed and give it more texture and dimension, so first I went over some parts with gesso and watercolors and then I stitched over some of the stripes with straight and zig-zag stitches. I love how that turned out.
It was finally time to adhere my flowers to my page. I attached them using thick foam squares. After that, I used the leaves that were included in the same pack as the flowers, I shaded and distressed the borders and added them to the layout.
I matted my photo with some scraps of patterned paper and then also added it to the layout. For my title, I used a word die cut saying "Hello" and some Abigail alpha stickers to write the word "Spring".
To make the layout cuter, I went through all of the embellishments to choose the ones I wanted to add. I love that part and Doodlebug collections always have so many choices... :)
I added some glitter enamel dots, jewels, enamel shapes (Sprinkles), die cut pieces and a flower clip. To finish I sprinkled some gold ink.

I hope you like the layout and are inspired to create beautiful projects with this super cute collection.
Thank you for stopping by,
see you soon,

Doodlebug products used:
- Fairy garden collection
Other products used:
- Sewing machine
- Sewing thread
- Lindy's magical powders
- Heidi Swapp Gold Color Shine
- Gesso
- White cardstock sheet
Subscribe to:
Posts (Atom)


