
Summer layout for HipKitClub
Sunday, August 19, 2018
Hey dear friends, today I'm sharing a super fun and summery layout with you.
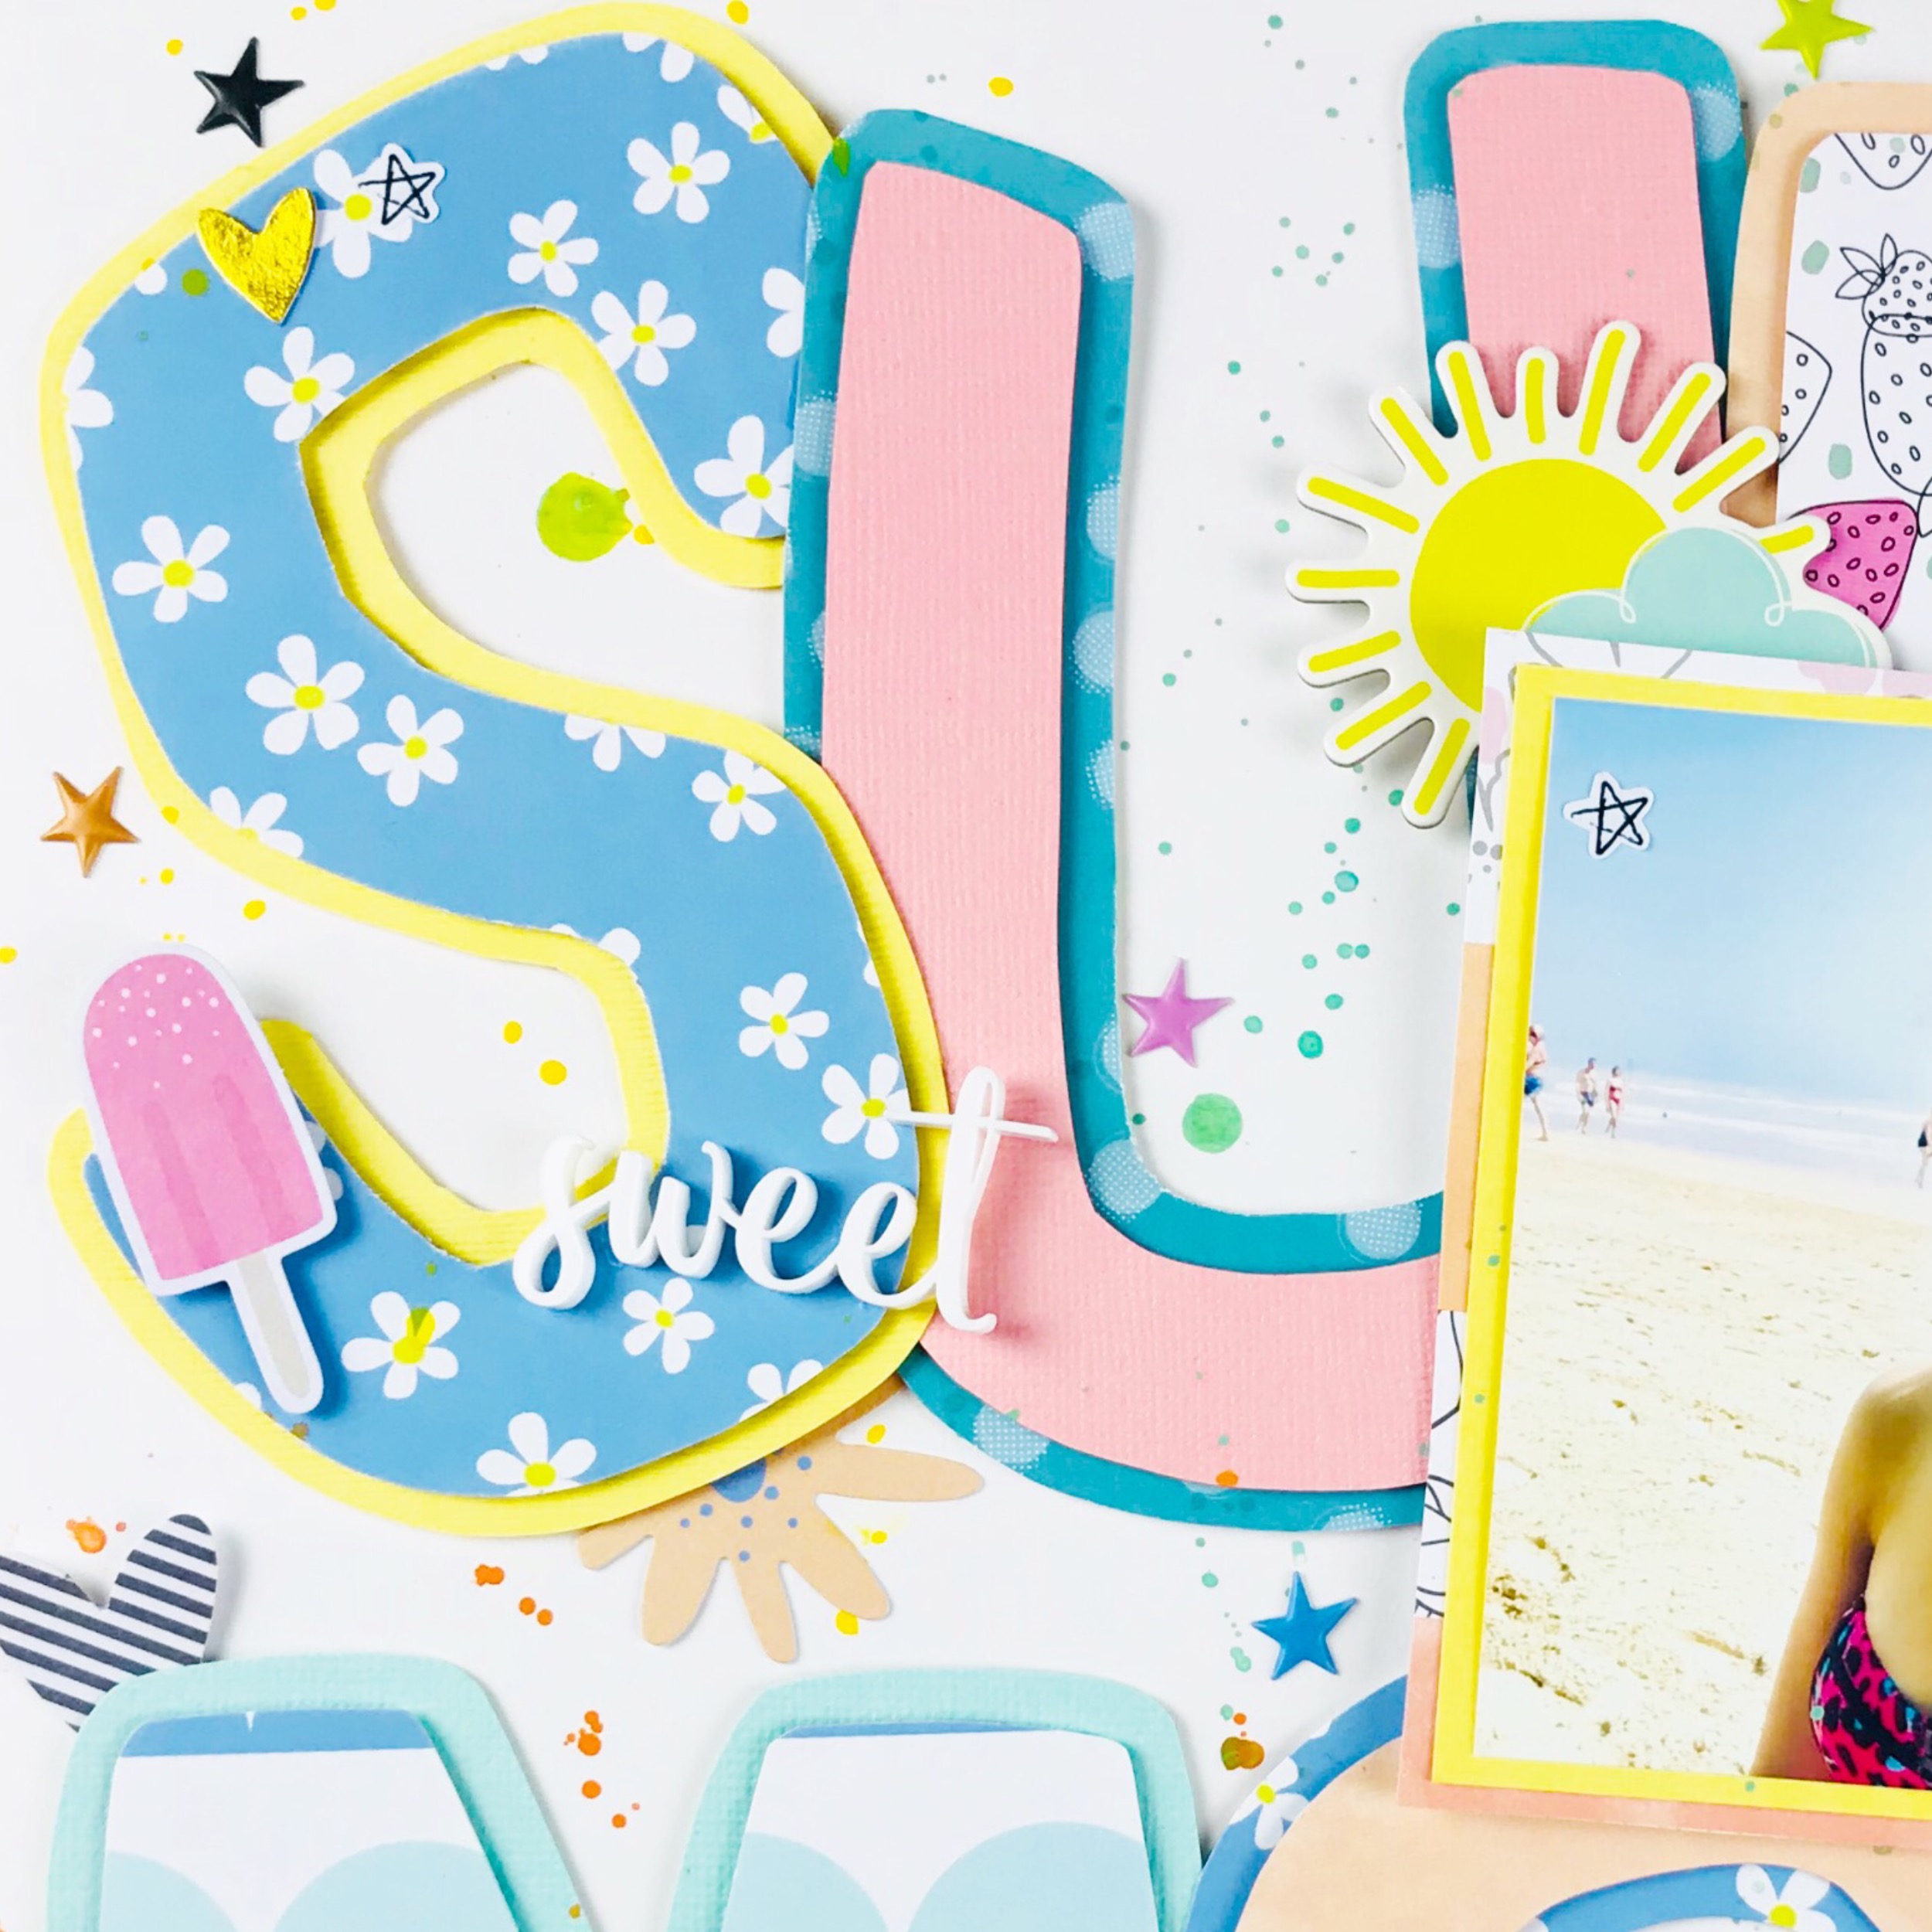


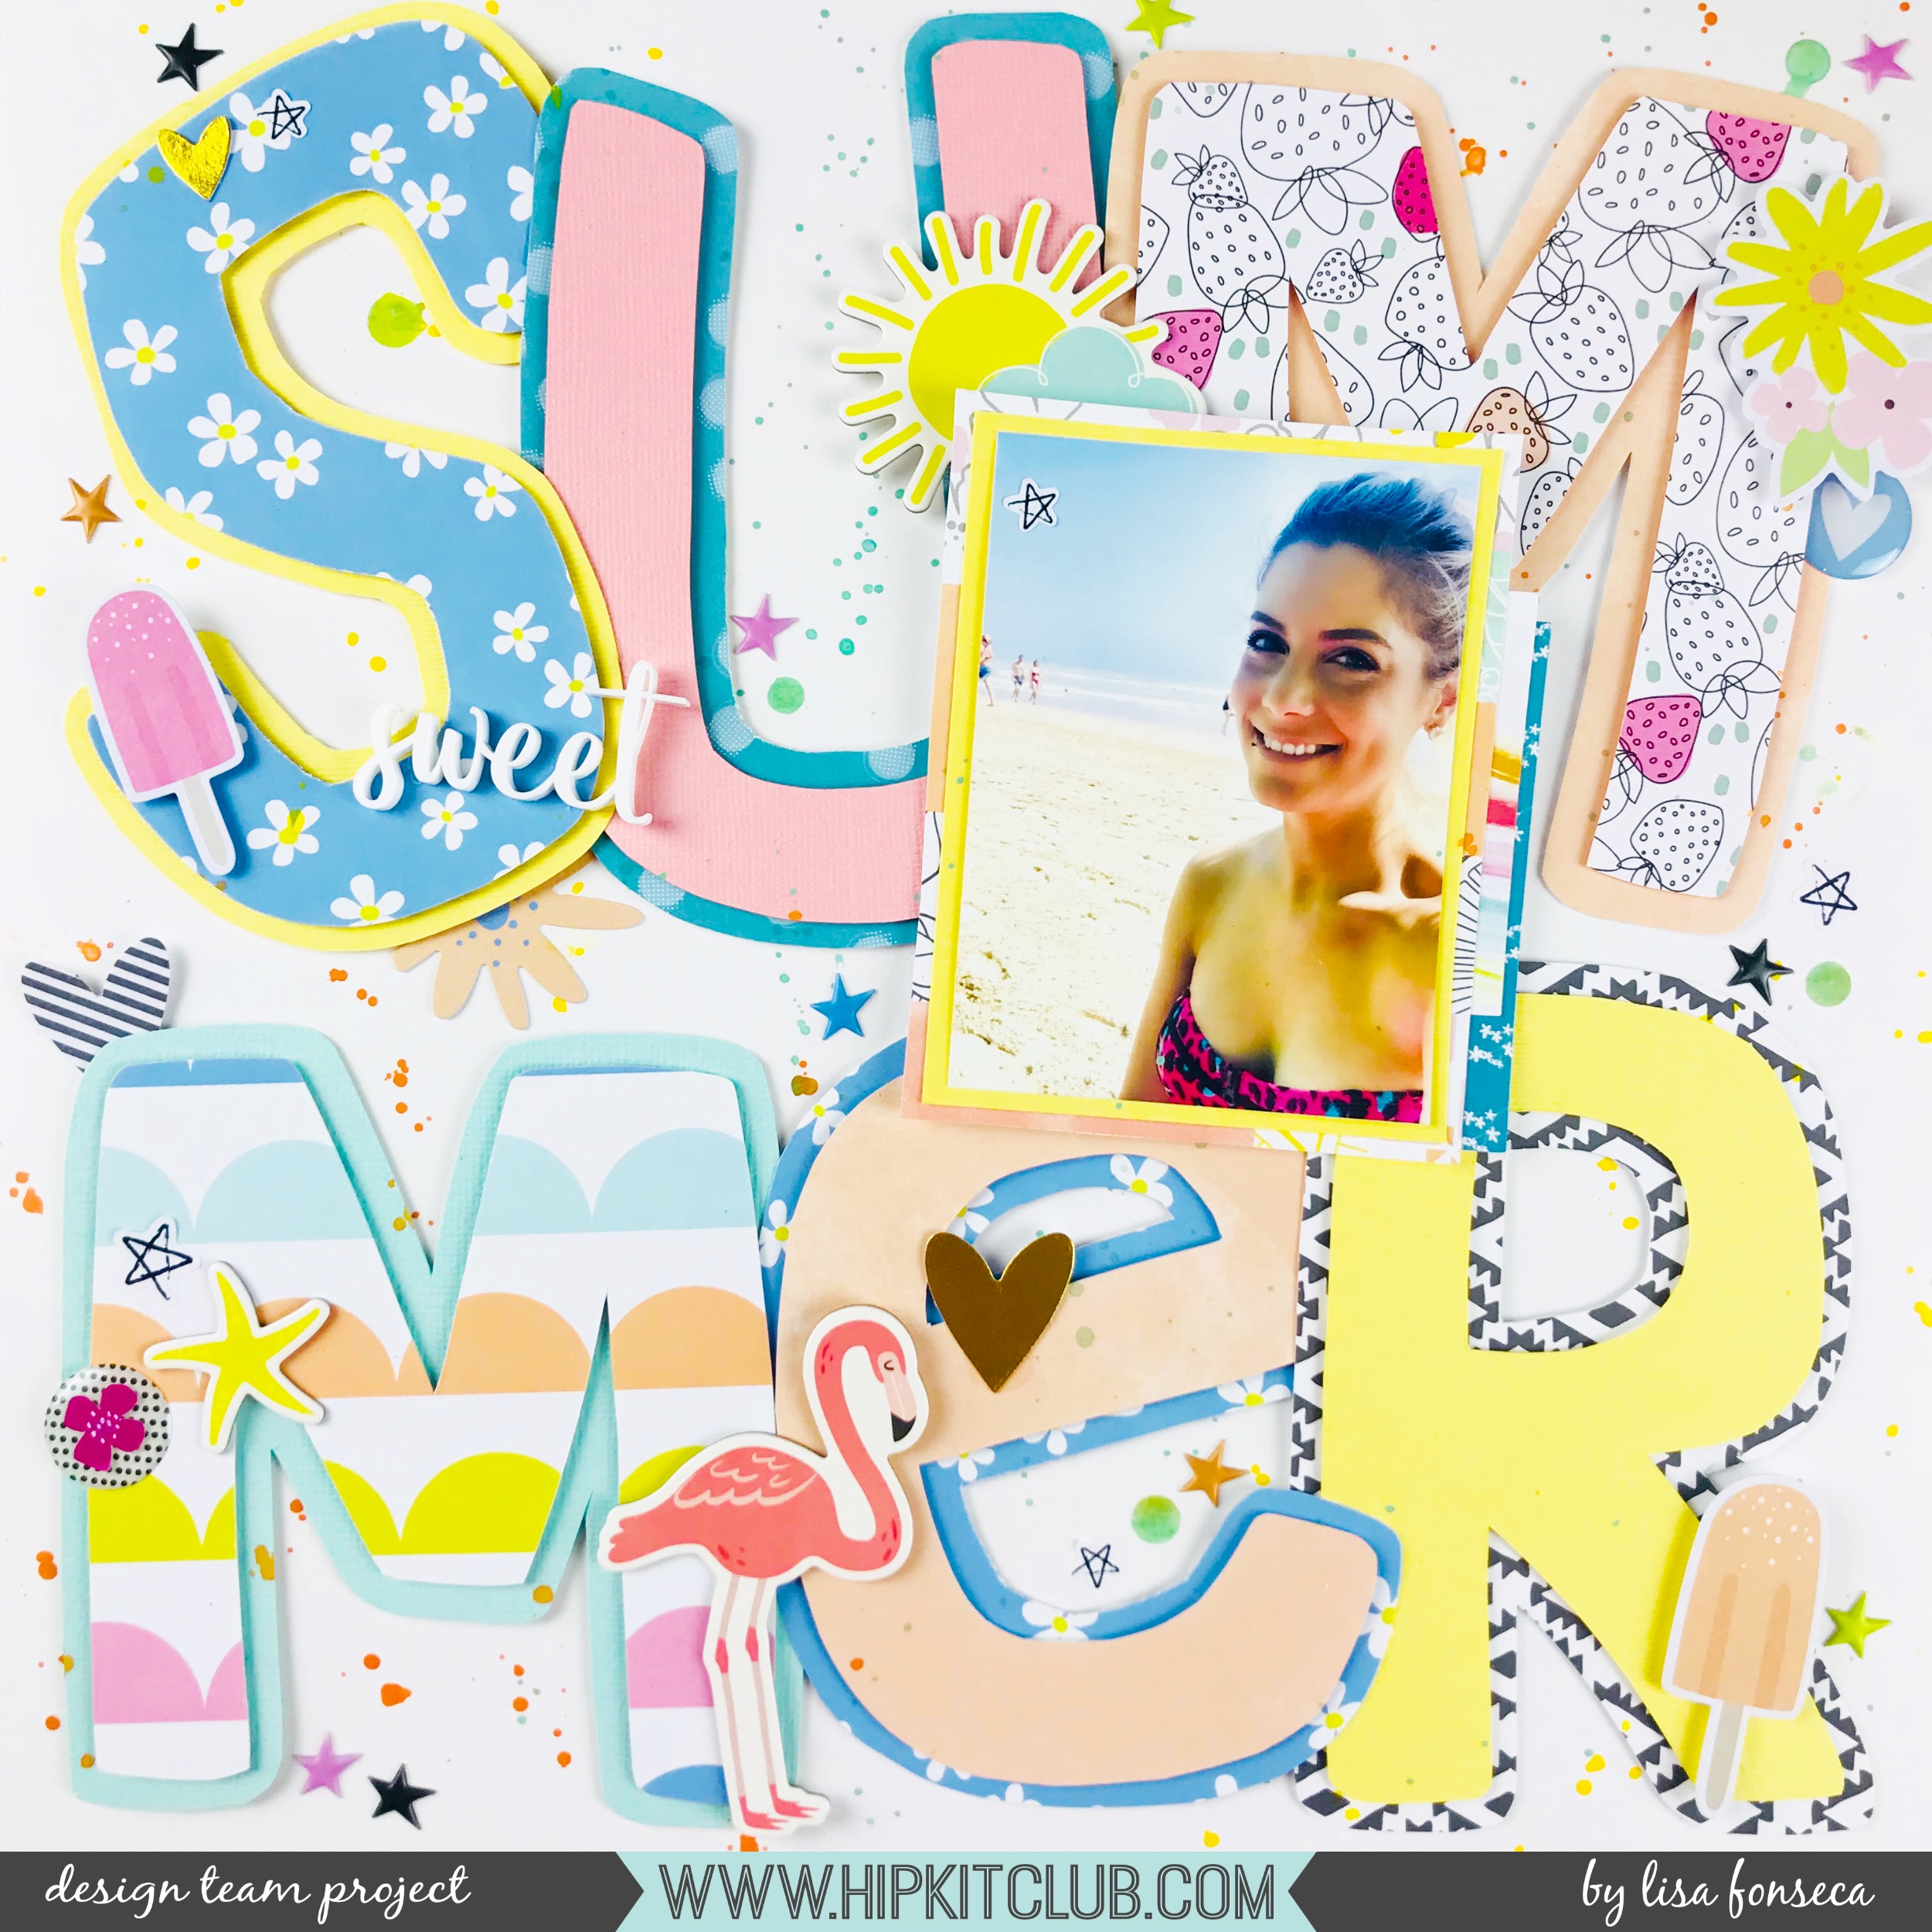
I scrapped a picture I made in vacation two weeks ago. I wanted to make a huge title and what title is better for a beach picture than 'Summer'?
So to start, I hand drew the letters I needed from different patterned papers and colored cardstock (main kit, paper kit, cardstock kit). Then I cut them out, placed them on another piece of patterned paper/cardstock and cut them out again, leaving a border. I really love how they turned out.
The letters were so big that I had to place them a bit one on top of the other but I really like how that looks. I also placed them a little bit crooked to make it even more fun.
To matte my picture, I used some pieces of patterned paper and placed the picture on top of a few letters so that I wouldn't cover one whole letter.
Then I went through all the embellishments from the main kit, embellishment kitand project lifekit and chose all the little pieces that I thought would add another layer of cuteness to my page.
I used this super cute chipboard flamingo from Simple Stories and those cool HKC exclusive white acrylic words (Embellishment kit), I also used some HKC exclusive ephemera pieces and epoxy stickers (Main kit) and some other little bits.
To finish, I mixed some of the Pinkfresh Studio liquid watercolors (Color kit) with some white paint, to brighten them up, and sprinkled some splatters all over the page.
I really love how this turned out. I think it's so fun and perfect for summer pictures.
Thank you so much for stopping by.
Lisa
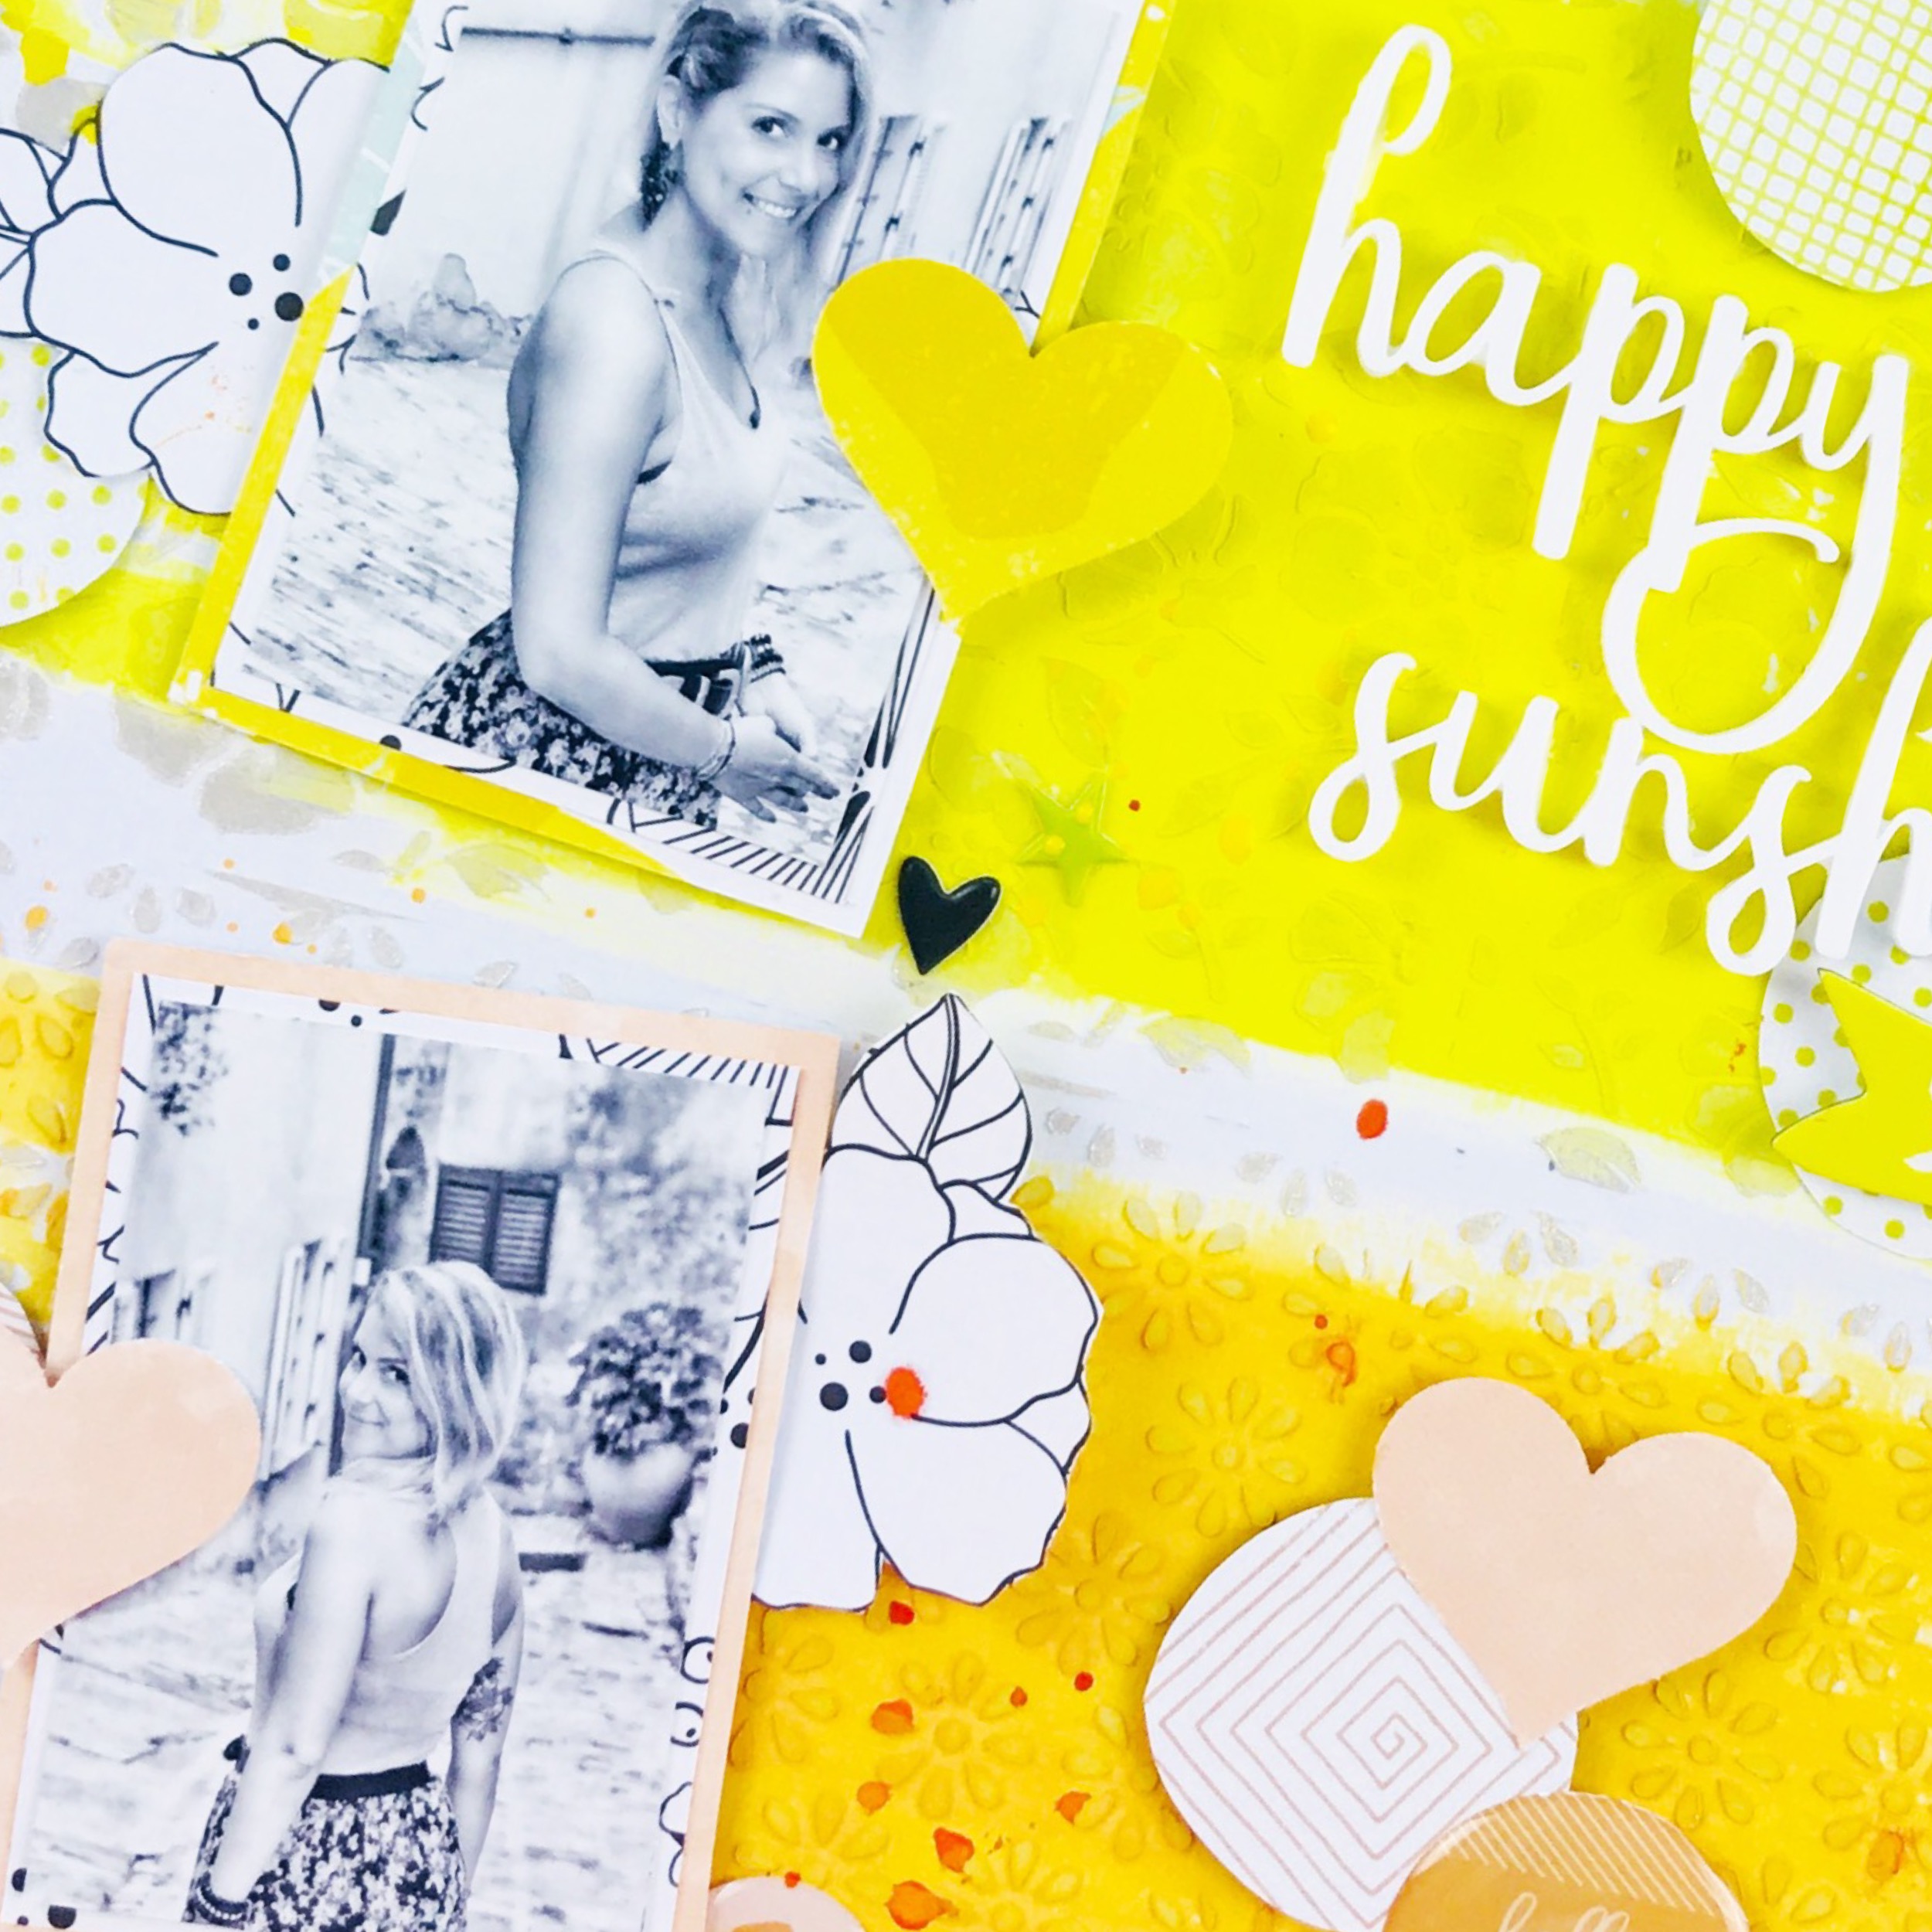
Happy Sunshine layout for HipKitClub

Hi scrappy friends,
it's Lisa back on the blog and today I'm sharing this fun moodboard inspired layout with you.
The moodboard is from Audrey Yeager.

I chose to go with the three colors we got in the Color Kit, so orange, yellow and teal andthe circles and the cute little flowers from the moodboard.
So to start I used a white sheet of cardstock (cardstock kit) and with the pearl texture paste from Vicky Boutin, we got a few months ago, I created some texture using stencils, that we also got in past color kits. Since I wanted to use the three colors, I created three different stripes with the texture paste. One with tiny flowers, one with bigger flowers and one with polka dots.
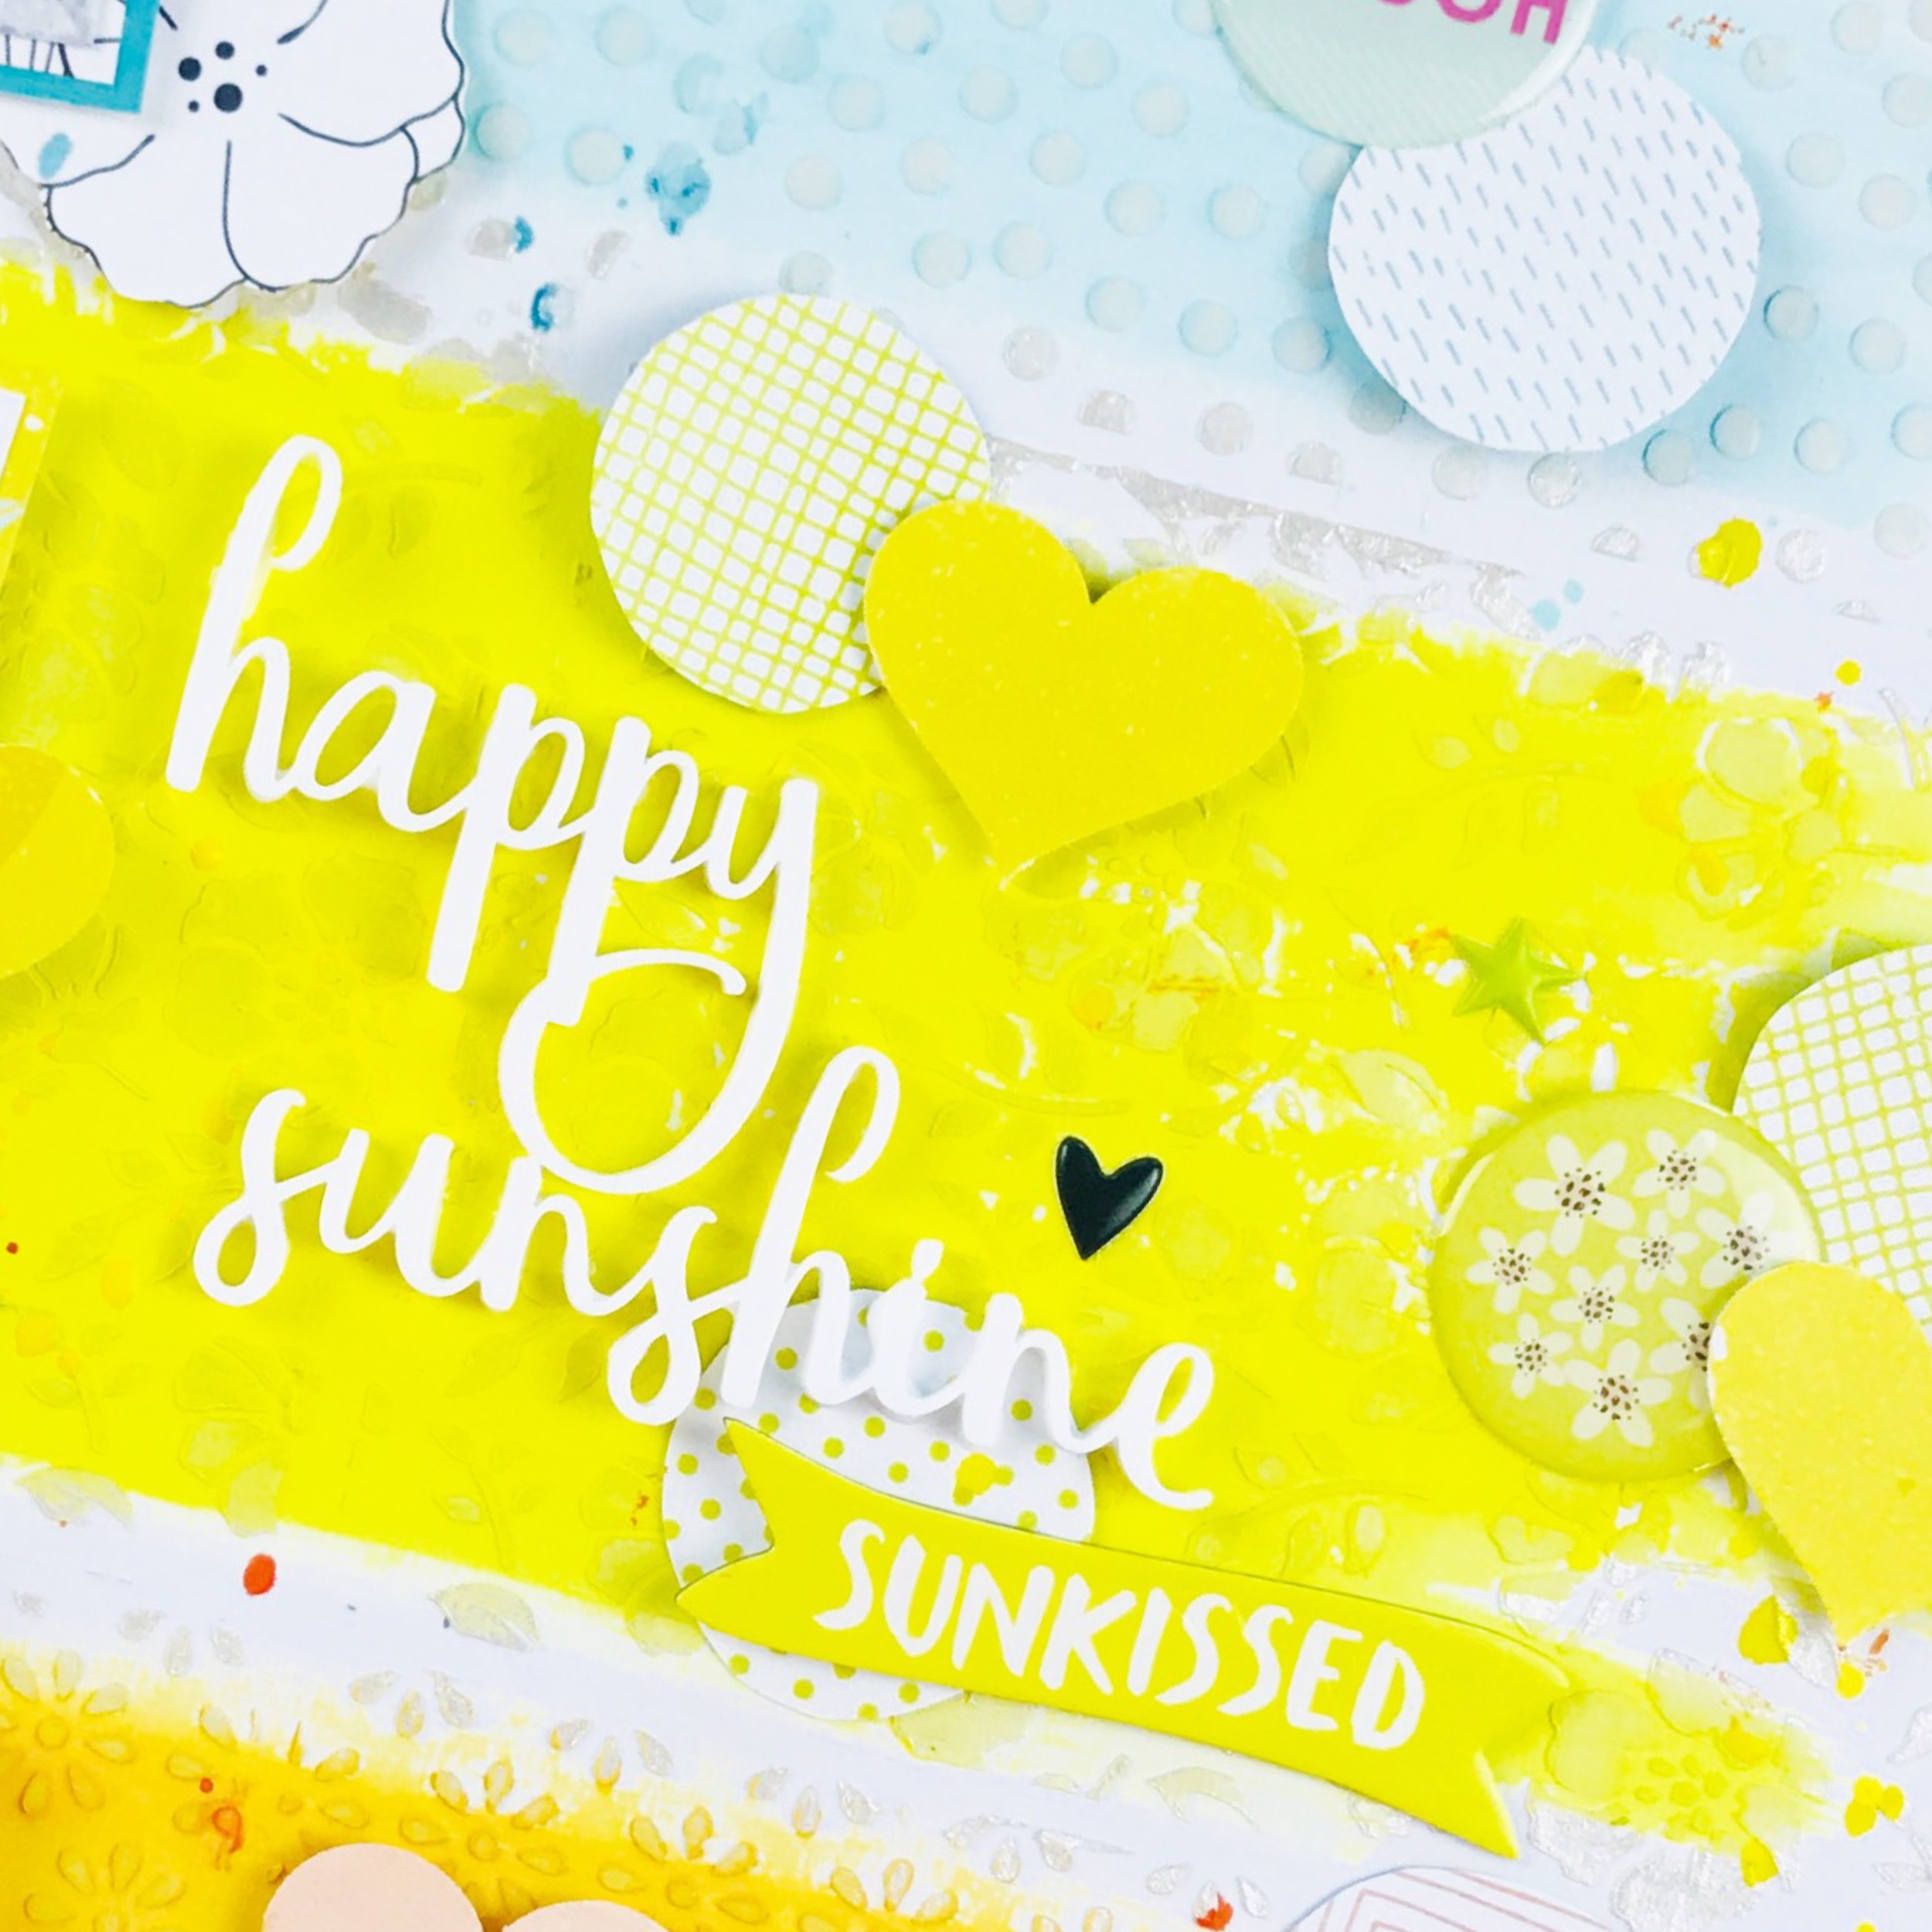
As soon as the paint was dry, I mixed some of the Pinkfresh Studio liquid watercolors (Color kit) with some white paint and water and painted over those three sections with a wide brush.
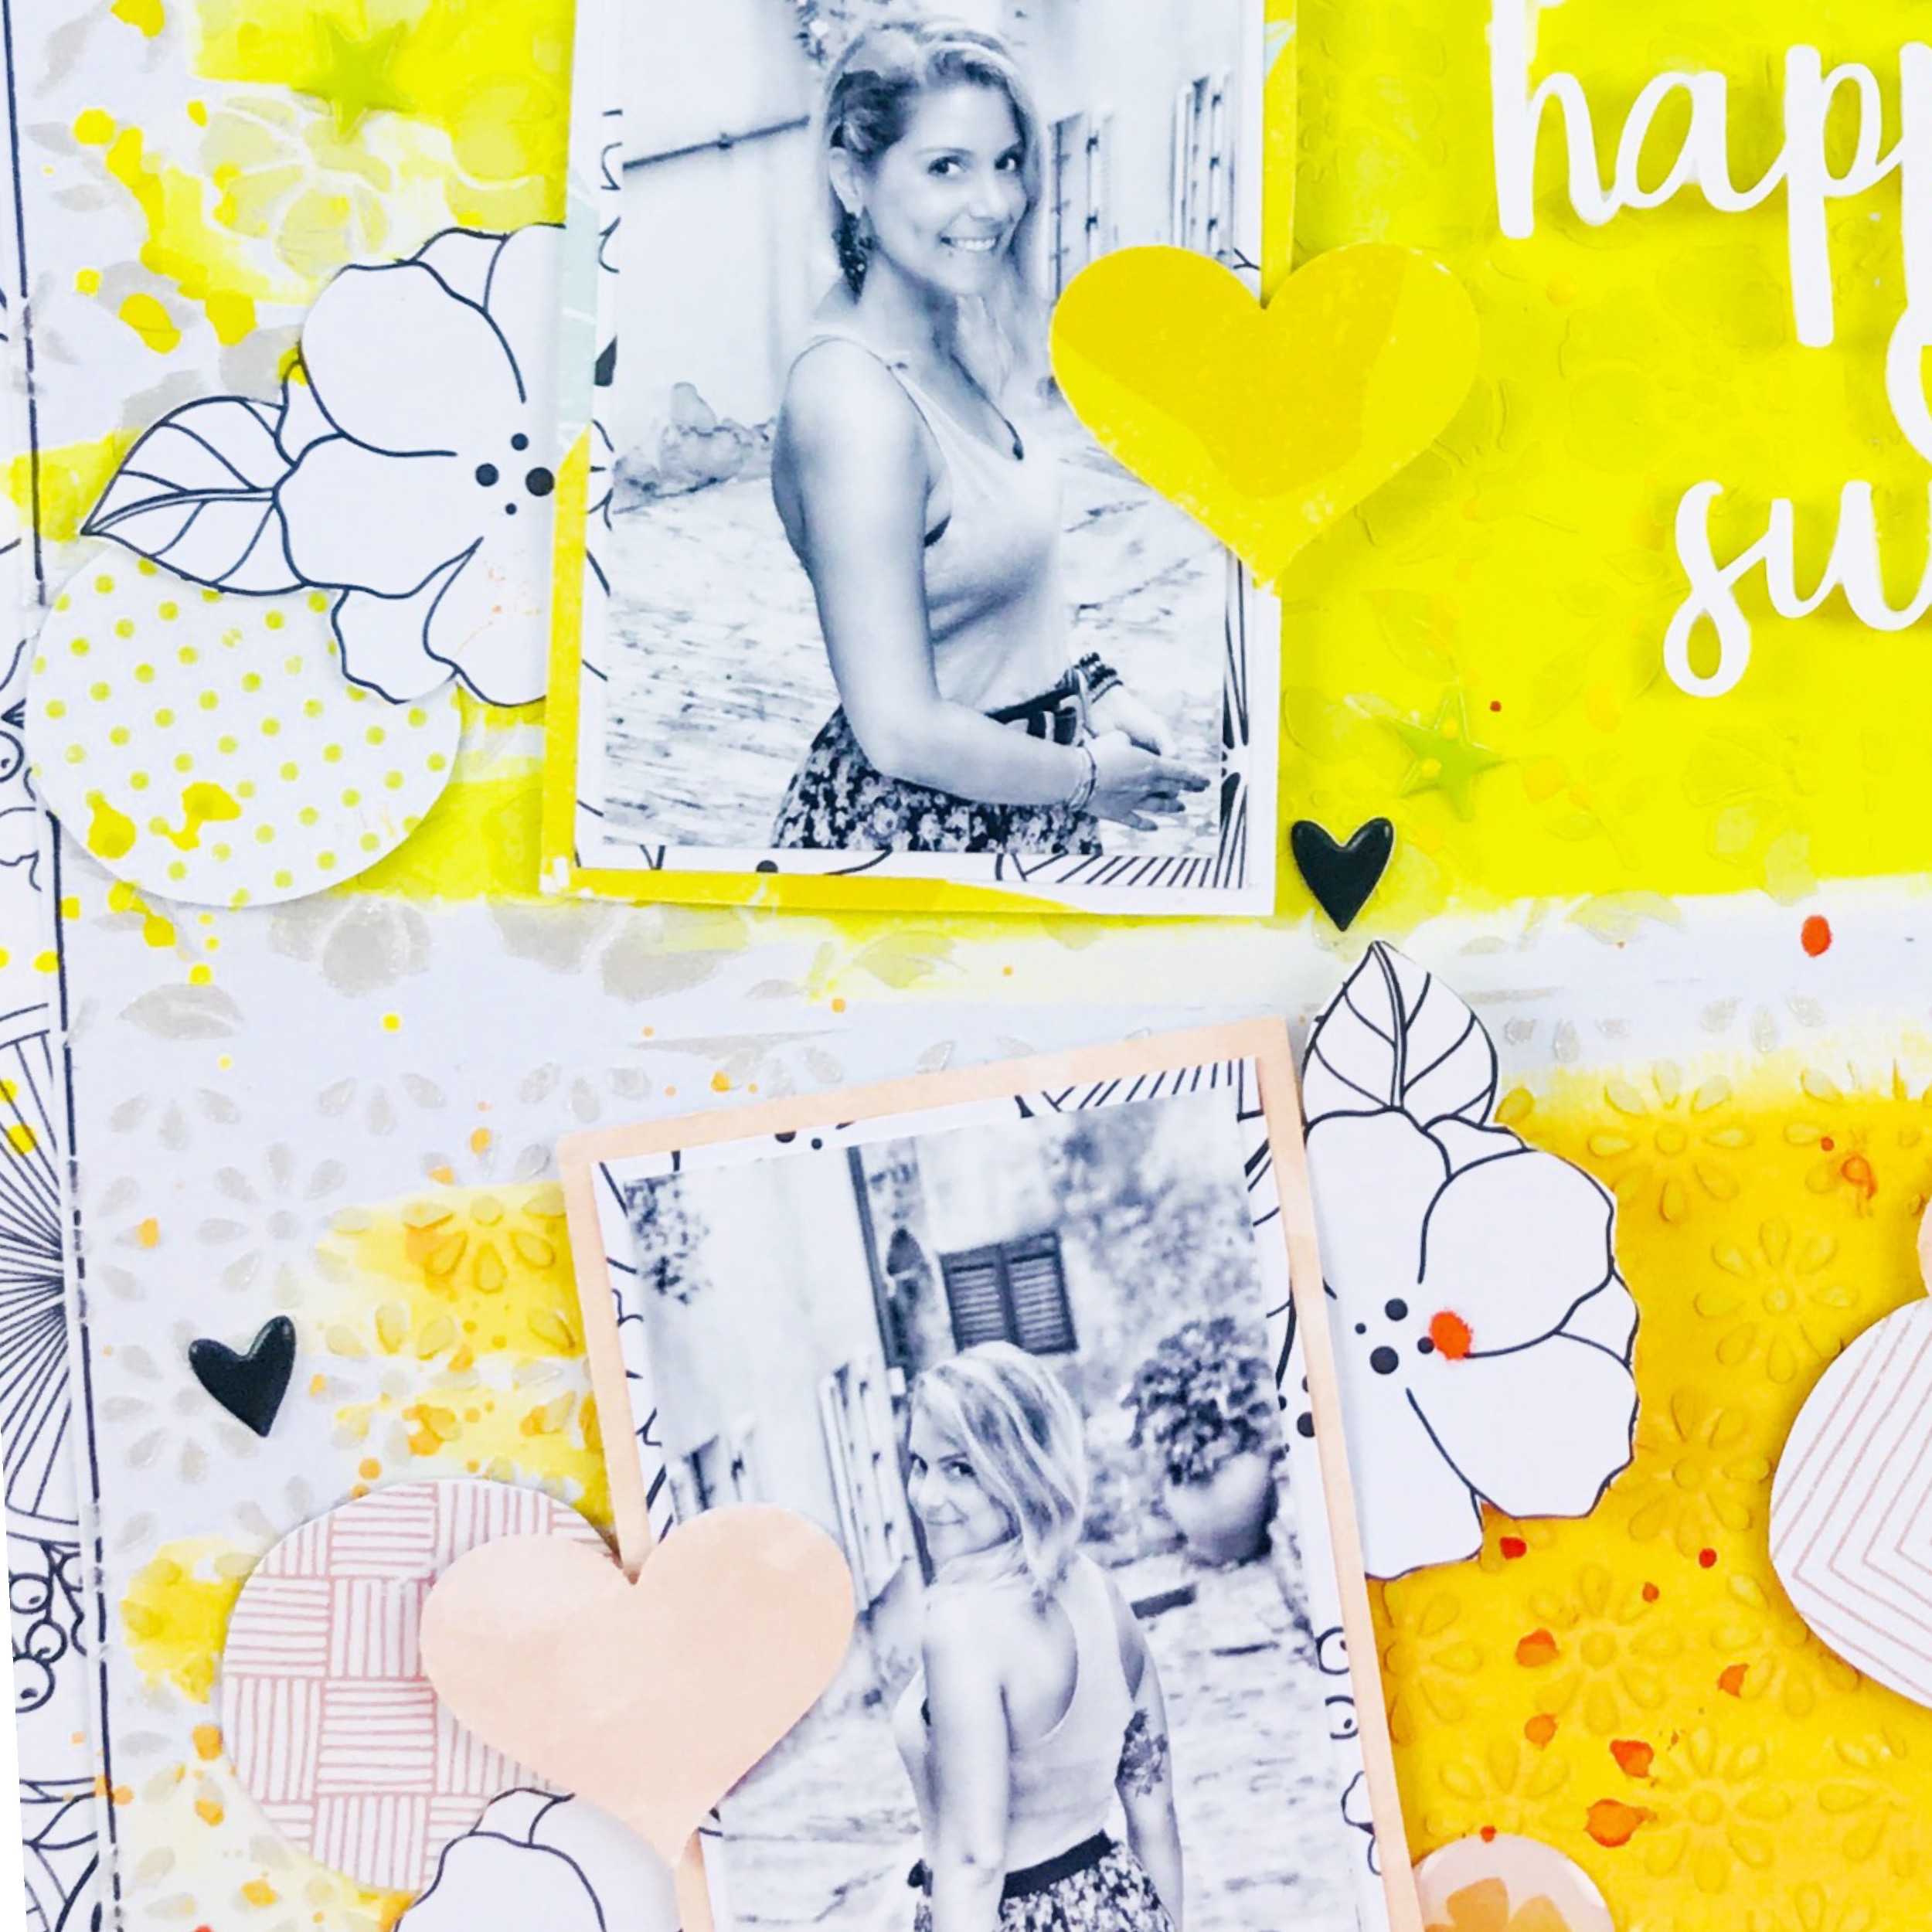
I cut off a third inch border from all around the page and placed it on a black and white patterned paper (Paper kit) to create a cool frame. Also, since the pictures were in black and white, I wanted to come back with some black and white in the papers and embellishments.

I used three pictures from my past vacation, matted them on color-matching patterned papers (Main kitand Paper kit) and placed them on the left side of my layout.
Then I cut out some of the white flowers from one of the patterned papers and placed them around the pictures.
From one of the Pinkfresh Studio patterned papers, I cut out a whole bunch of yellow, orange and teal circles and placed them on the matching stripes. I also punched out a few hearts and added them to the page.

I chose some of the HKC exclusive epoxy circles (Main kit), a chipboard piece from Simple Stories (Embellishment kit) and some black HKC exclusive puffy hearts (Embellishment kit) to add to my page.
As a title, I used some of the HKC exclusive acrylic words (Embellishment kit) to write 'Happy sunshine'.
I hope you like how it turned out :)
Thank you for being here!
Guest blog post for Education.com

Hi dear friends, today I'm sharing something a little bit different.
As a few of you may know, I'm a preschool teacher. So I've teamed up with Education.com to give you this little creative activity idea for the book The Hungry Caterpillar.
Check out the Education.com site to find many more ideas :)
What fruits did the caterpillar eat and how many are left? In this activity, students will manipulate the fruits that the caterpillar ate to practice subtraction.
What You Need:
-
The Very Hungry Caterpillar book by Eric Carle
-
Caterpillar, option to make with felt or draw it on paper
-
Fruits from the story, option to make with felt or draw them on paper
-
Paper
-
Crayons or markers
-
Scissors
What You Do:
-
Read The Very Hungry Caterpillar to the student. As you read the book, you can count the fruits the caterpillar eats.
-
After reading the story, explain to the student that you will reenact the part of the story where the caterpillar eats the fruits.
-
Begin by using the same fruits in the book to do the subtraction part of the activity.
-
Have the student first count how many of each fruit he has, and every time the caterpillar eats a fruit he needs to subtract the amount he has.
-
When the student is done using the fruits from the book, you can give him an opportunity to get creative by drawing other fruits the caterpillar might eat that were not in the story.
-
Have him draw a few of the fruits he comes up with in order to have various amounts to work with. You can also help him draw fruits so that there can be enough to be able to do the subtracting.
-
When he is done drawing the fruits he can cut them out.
-
After cutting the fruits, you can have him start the activity again by counting and subtracting the fruits the caterpillar eats. The caterpillar does not have to eat all the fruits. For example, there can be 10 kiwis and the caterpillar only ate 4.
-
To conclude the activity, he can write down the amount of fruits he initially started with and the remaining amount he has.
For more fun and engaging learning activities, go to Education.com!
Happiness layout for PINK PAISLEE
Sunday, August 5, 2018

Hey scrappy people,
today I'm showing you my newest layout using some of my favorite elements from the Paige Evans Oh My Heart collection.

I honestly have to say that this is my favorite collection of all time!!! The flowers are the prettiest, I'll never get sick of this collection and could use it for every layout :)
Soooo, to start this layout, I chose pink, purple and orange papers from different Paige Evans collections, Pick-me-up, Turn the page and Oh my heart. I used a scalloped border cutfile and let my Silhouette cut everything out. Then I placed the pieces on my page, going from orange to purple. In between the borders, I also used some washi from the washi books and some ribbon.

I used matching threads to hand-stitch and machine-stitch through some of the pieces, to add some interest and texture.

Then I took the flower patterned paper from the Oh my Heart collection, cut the flowers out, adhered them to white paper and cut them out again, leaving a white border. It's very hard to find this paper in stores, but here are some 'print and cut' cutfiles for these flowers...#184297 #184294 #184282 #184183. You can buy them in the Silhouette store.

I matted my picture on a beautiful patterned paper from the Turn the page collection and placed it on my layout. Then I placed my big flowers around the picture in a vertical line.

To embellish my page a little more, I used some stickers from the Pick-me-up collection and also some rose gold transparent stickers from the Oh my Heart sticker book.
Added some white splatters and I was done! :)

Thank you so much for stopping by!
Subscribe to:
Posts (Atom)


