Create with friends layout for DOODLEBUG DESIGN

Sunday, July 18, 2021

The crafty collection that you've been waiting for, is finally here!!!

When I got the new Cute&Crafty collection, I couldn't wait to create something with it... I even took a photo of me and two friends, when we were scrapping, to make sure to have my photo ready to go.

Here's my first layout created with the new super adorable Doodlebug collection.


For this first layout, I wanted to make sure to use as many of the cute little stickers, as I could. An easy way to do that, is to have something on your layout, that you can fill with stickers and embellishments.

Since it's a crafty collection and I love to have my layouts super colorful, I decided to go with splashes of color, that I could fill with tons of embellishments. 
I started by choosing the patterned papers and cardstocks and then cut out random, wonky shapes for the splatters. As a background, I used the patterned paper filled with little splatters of color. I just LOVE that paper and was so pleased to see it in the collection! :)


When I had my big splatters cut out, I colored the edges using my Distress Oxides and then distressed the edges with my scissors. I adhered them to the background, just putting a bit of glue in the middle of each splatter, so that the edges would bent up and give a lot of dimension. 

I went through the cardstock stickers and started adhering them to each splatter, using matching colors. then I also used enamel hearts and dots and jewels in each of the colors to fill smaller holes. I also loved using some of the buttons and threaded some embroidery thread through them, with a little knot. 


I matted my photo on some layers of patterned paper, adhered it to the layout and then went on with my title. 
When it was time to create the title, I noticed that the background would be a bit crowded and that the title would probably have a hard time standing out... So I used white paint and a baby wipe to create some lighter areas around the photo. I wasn't sure how to make the title. At first I thought I wanted to make each letter with a different color. I tried that, but with all the color going on, it wasn't working. So I decided to go with a cursive font and the color black. 


I liked that a lot better and that way the title was really standing out and balanced the black in the photo. I added the words "with friends" to my hand-cut word "create", using alpha stickers in black. 

I used two Doodle Pops around the photo and then also used some black enamel hearts and splattered some black ink, to add more black around the page. 


For a final touch, I ripped a bit of the background page from the upper right and bottom left and backed the missing pieces with the striped rainbow paper from the collection. 


I hope you like the layout and are excited to try the new collection!

Thx for stopping by,


Facebook
 Instagram YouTube


Doodlebug products used:
Cute & Crafty collection
Embroidery thread
Colored cardstock
Black enamel hearts

Other products used:
Black pen
Distress Oxides


Happy to be free layout for Doodlebug Design

Monday, July 5, 2021

It's time to get out all of your blue, red and white stuff and have a fun 4th of July celebration!!! :) At least, if you're living in the United states, haha!

I live in Luxembourg, so of course, we don't celebrate 4th of July. We celebrated our National holiday on June 23rd tough and the colors of the luxembourgish flag are blue, red and white too, so I could pretty much use everything 4th of July themed here too... but, for this project I made a layout about freedom and how important it is to me to just feel free.

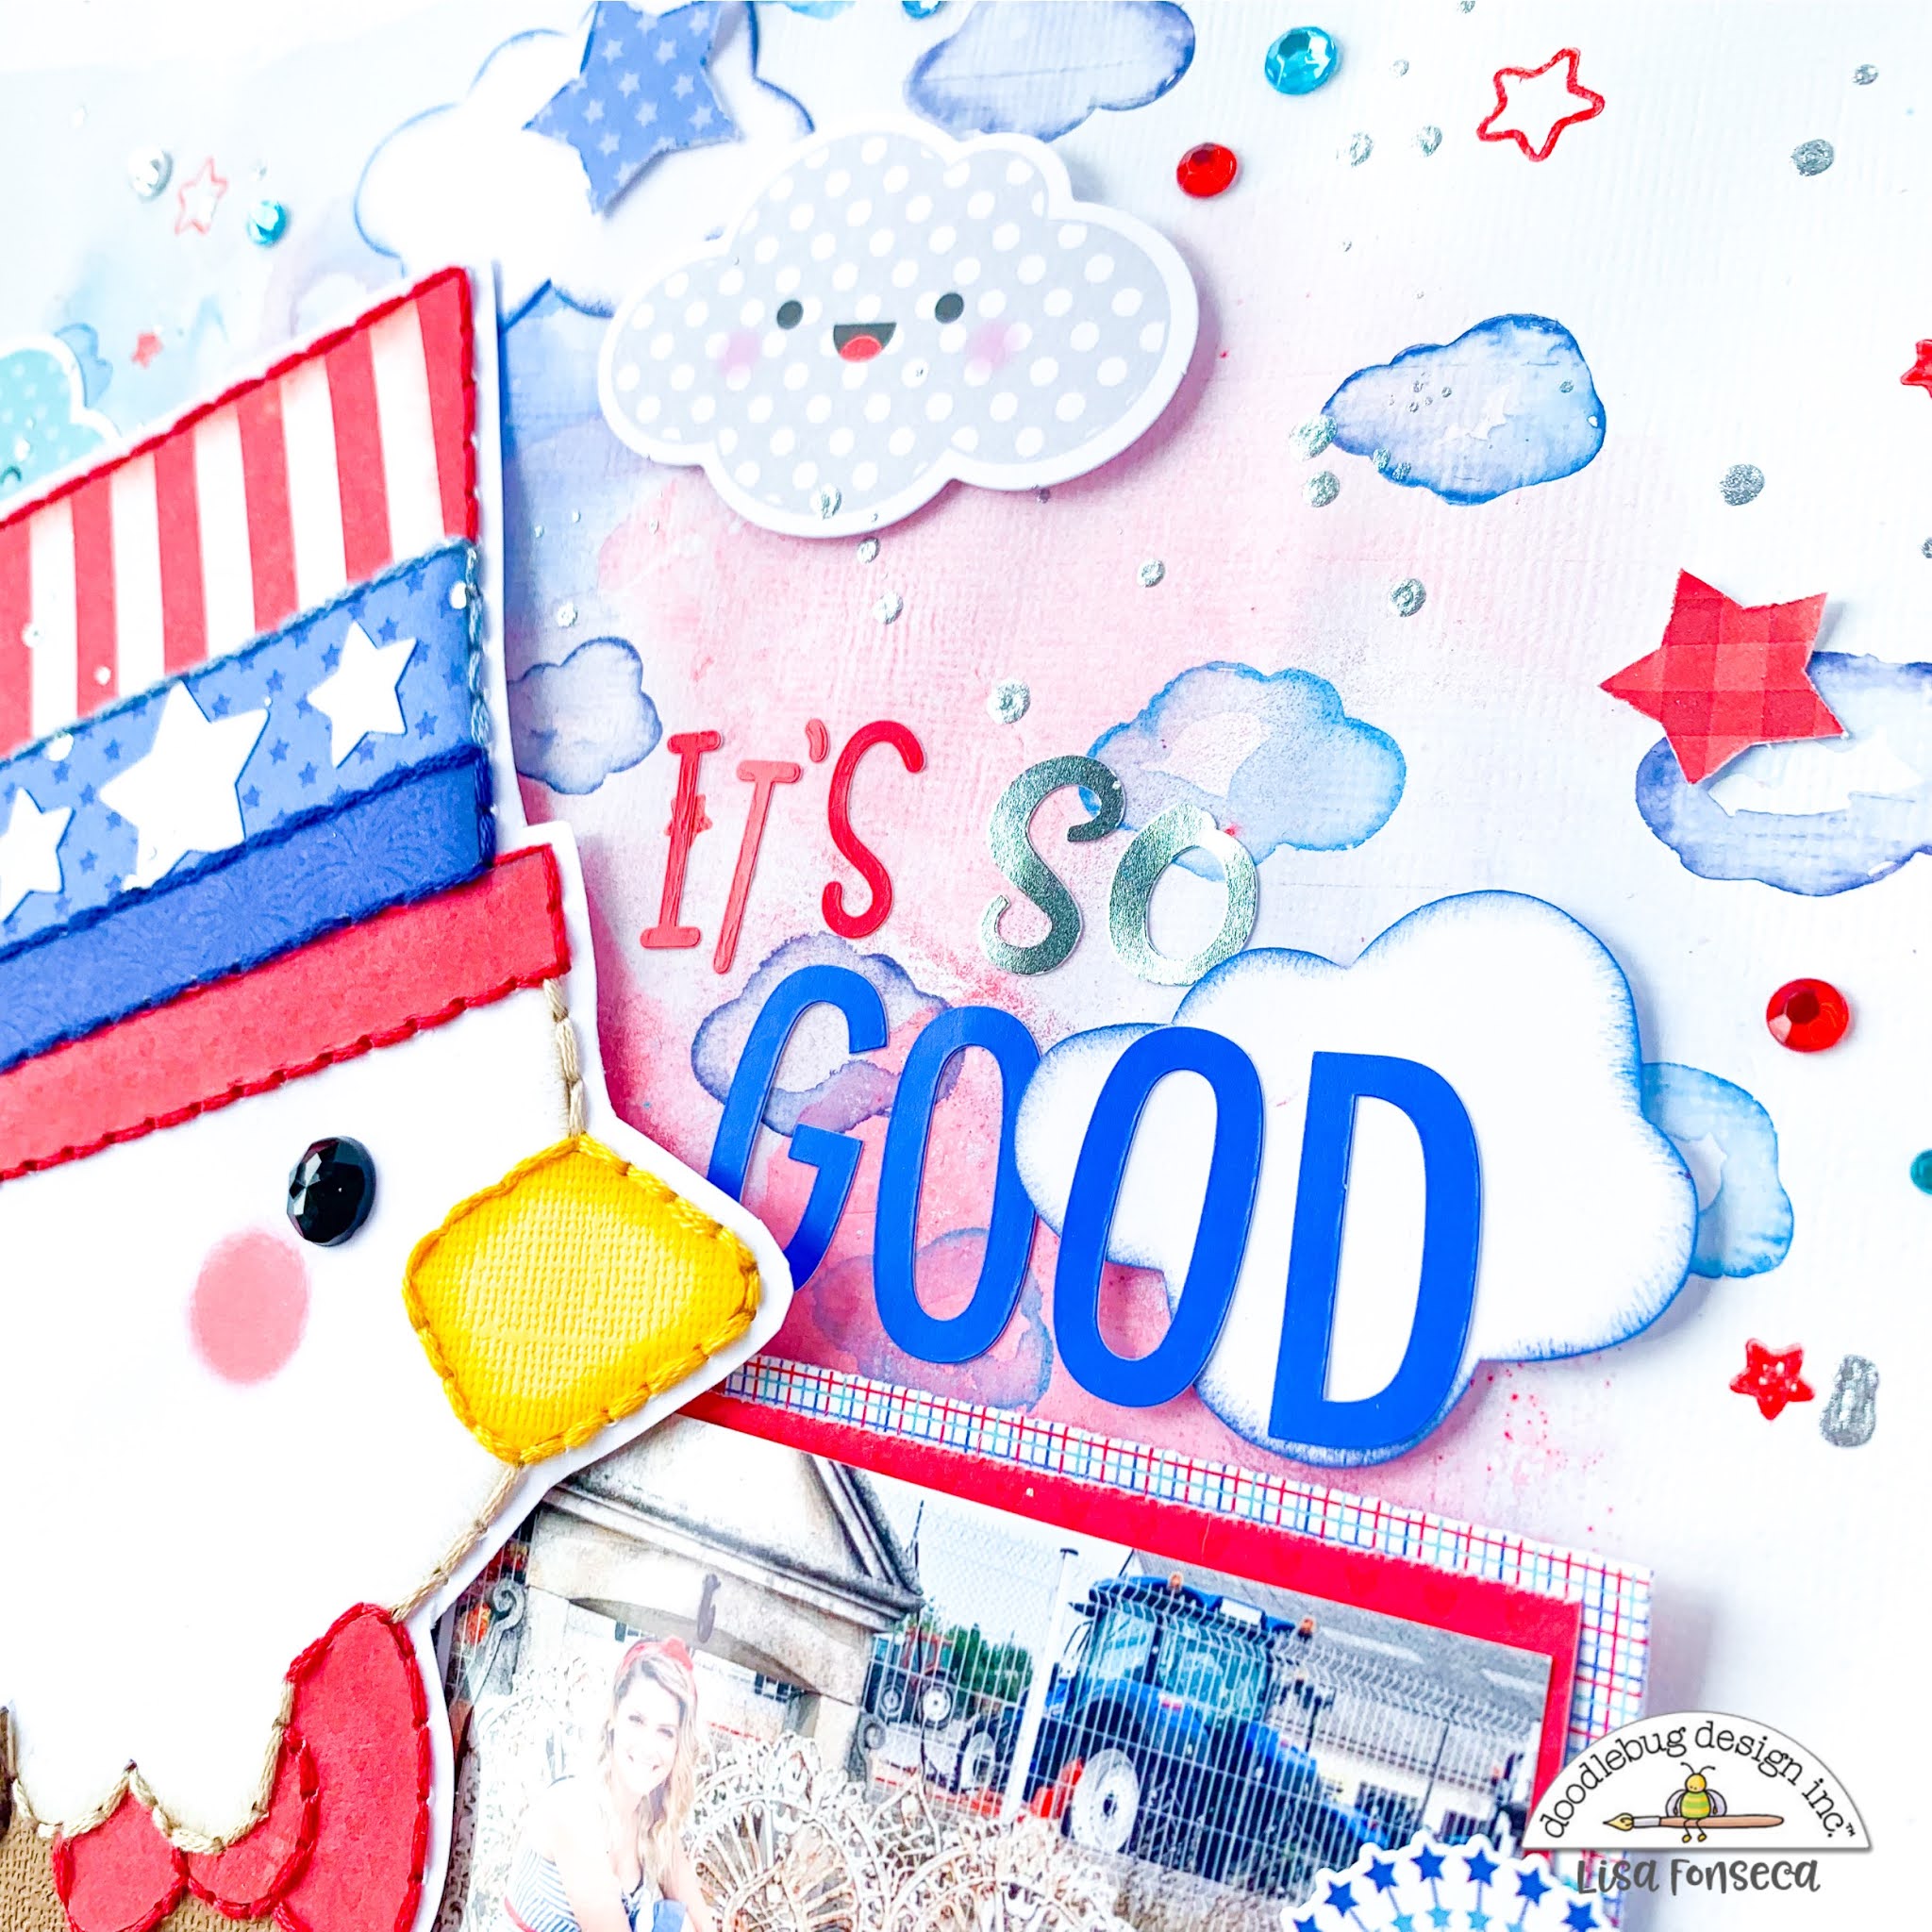
When I went through the Land that I love collection, the cute eagle Doodle-pop just really caught my eye and I wanted to paper-piece and hand-stitch it in a much bigger size, to be the star of my layout... :)

So I started by hand-drawing the eagle onto a white sheet of paper, cut out the different parts, traced around them on the cute patterned papers from the collection and then adhered everything together and stitched around, using different colors. Before I adhered the parts together tough, I created shadows with my Distress Oxides. For the eye of the eagle I used a big black Jewel.


For the background, I chose a white 12x12 sheet of paper and did some mixed media on it. I prepped the page with white gesso, let it dry and then used gelatos to get some color on there. Of course, I used red and different shades of blue and teal. When it was dry, I used the two cloud stamps, included in the stamp set from the collection, to stamp some little clouds on the upper part of the page. I used Distress Oxides to stamp and then used a small brush with water to go over all the stamped lines of the clouds and make them more blurry and faded and color them in a bit.


Then I cut out some clouds out of white paper, put some color around the edges and added them to the background. I also used three die-cut cloud pieces to add. 

For my photo, I chose one that matched perfectly with the colors, since that day I was dressed in blue, red and white. Plus, we took that photo when we visited Provence, FRANCE, and I really felt good and... free! Free to do what I wanted, free to go where I wanted, just free and happy... the way I pretty much feel every day... haha :)

I matted the photo on four different patterned paper scraps and then I placed my eagle and photo on the layout to see how I wanted it to be. When I found a good placement, I adhered everything down, using foam tape for the eagle. 


I went through the embellishments and chose some die-cut rosettes and stars, enamel dots, Jewels, cardstock stickers and alpha stickers to add to my page. I love how these last additions always make the page a lot cuter. I splattered silver paint all over and then I was done! 


I hope you like the layout and are inspired to create a fun red, blue and white project. 

For all my friends, living in the USA, have a great 4th of July celebration!!! :)

See you soon,


Facebook
 Instagram YouTube


Doodlebug products used:

- Land that I love collection

- Black Jewels

- Alpha stickers


Other products used:

- Embroidery thread

- Distress Oxides

- Liquitex gesso 


Recipe Mini book for Doodlebug Design

Do you have a ton of yummy recipes that you want to share with best friends or family? 

Well, I have a super cute gift idea for you, using the sweetest and yummiest Doodlebug collection, Made With Love.


For this project, I absolutely wanted to use this cute collection again! I wasn't sure what to create, but I was thinking about not making a layout, as I usually do, when my eyes fell on the recipe cards, included in the collection. They are so sweet and the perfect size for a small recipe book, in which you can save your fave recipes and makes an amazing little personalized gift too.


I started by choosing all of the patterned papers that I wanted to use for my decorated pages. I used eight of them and also wanted to include one of the cards, from the cards and envelopes pack. I wanted to add three recipe cards in between every two decorated pages. 


For the cover I used this pretty teal patterned paper and for the back cover, the polka dotted yellow paper. I used thick chipboard to wrap the paper around, to create a very sturdy album. I bound all of the pages with a Cinch tool and for an added cute look, I added a lot of colorful twine to the binding wires.


I went crazy with decorating the book, using Doodle-Pops, enamel dots and shapes, jewels, stickers and buttons. I LOVE the buttons included in this collection and wanted to add as many as possible :)

For the front cover, I also created a cute, distressed flower and added a button with a bit of twine in the center. 

I love using Doodlebug Alpha stickers. Since I have so many colors and fonts, it's so fun to create interesting titles, varying fonts and colors. 

Take a look at all of the pages, which I had a lot of fun creating...


This is how the recipe cards look. They are so cute and awesome to write down your fave recipes that you never want to forget or that you want to share with a loved one.


Can you spot the little cutie that made it all the way from one collection to the other...? ;)


On this last page, I added a piece of acetate, creating a little pocket in which you can add little notes and tickets. 

Can you spot all of the buttons I used on each page? My favorites are the brown square ones, on the chocolate page... ;)

I hope you like this little project idea and are inspired to create your own recipe booklet.

See you soon, 

Facebook Instagram YouTube


Doodlebug products used:

Made with Love collection
Doodle Twine and Chunky Twine in Bumblebee, Limeade, Ladybug and Bubblegum
Paper Frills
Alpha stickers: Sunshine, My Type, Skinny

Other products used:
Cinch tool
Binding wire
Chipboard
Acetate


Latest Instagrams

© Lisa Fonseca. Design by FCD.