Winter Chillin' layout for Doodlebug Design

Tuesday, January 23, 2024

Happy new year everyone!!!

I'm wasting no time and diving right into Winter layouts... Today I'm sharing a layout I created with the amazing SNOW MUCH FUN collection.


I have to be honest... I had to go back a few years to find a photo that suited this collection and layout. There hasn't been a lot of snow this year and the day there was, I forgot to take pictures... :) So on this photo, you can see me with a friend as we spent time at Schwarzwald in Germany where we went to for a wedding.


To start, I ripped off irregular strips of 4 different patterned papers. I love the colors in this collection and the four colors look so good together. I stacked them one on top of the other and messed up the ripped edges a bit, to give the scene more texture. 

Then I went through the embellishments and chose a few things. It's always so much fun going through everything in the Doodlebug collections, since you have soooo many things to choose from... sometimes I even have a hard time deciding... haha! 


So I chose a few of the Doodle Pops and adhered them where I thought they would look pretty. I also added the little hearts and snowflakes that were in the Doodle Pops packages. Then I matted my photo with 4 random rectangles of patterned paper and added it to the layout. 

I went through the die cut pieces of the Odds&Ends pack and chose snowflakes, clouds, trees and a little bunny. I cut off a bit of the white borders and added them to the layout. 


Then I went in with some metallic water colors and added some teal, pink and purple around the photo and clouds. I love the dimension it gives the layout. I also sprinkled pink and purple watercolor all over the layout. 

For my title, I chose two words form the ChitChat pack. I added pink color to the inside of the word "Winter". To finish, I added some jewels... always use the jewels...they make everything look a thousand times better... :)

I hope you had a great start in the new year and are ready to scrap some Winter photos.

Youtube / Facebook / Instagram


Doodlebug products used:


Snow much fun collection


Other products used:


Metallic watercolors


Christmas cards for Doodlebug Design

Monday, January 8, 2024

I know a lot of people LOVE making cards... I have to say, I'm not really one of those people... For me it has always been more fun to create mini albums and layouts. But, once in a while, I have a fun idea for a card and I enjoy making it. So for this project, I created two cards with sentiments using the Gingerbread Kisses collection.


I love making layouts with super big letters, so for these cards, I used that technique, where I hand-cut letters out of patterned papers, without pre-drawing them... I just go for it :)

So, I cut out the letters, to write the words Jolly and Merry (for the sentiments "Holly Jolly" and "Merry Christmas"), from the patterned papers of the 6x6 paper pad. Then I adhered them to a 4 1/2 inch strip using foam tape and then cut off the excess of the strip.

I adhered that piece of paper to a card base I created out of patterned paper too, making it slightly bigger than the strip with the letters, so that a border would peek out from all of the sides. 


To make everything stand out more from the paper behind it (because there are a lot of layered patterns...), I traced black scribbly borders all around the letters, the strip and the base. 

I then took the puffy stickers (which btw are a product that is pretty new and I love it!!!) and added them here and there on top of the letters. 
I also added some gold enamel dots from the Hello Again collection. 


To finish the sentiment, I added Alphabet Soup stickers in Gold to the card.

Enjoy whatever holiday you celebrate or just this cozy winter time and see you in the new year.


Youtube / Facebook / Instagram


Doodlebug products used:


Gingerbread Kisses collection

Gold enamel dots from Hello Again collection

Alphabet Soup stickers in Gold


Santa Mittens for Doodlebug Design

Wednesday, December 20, 2023
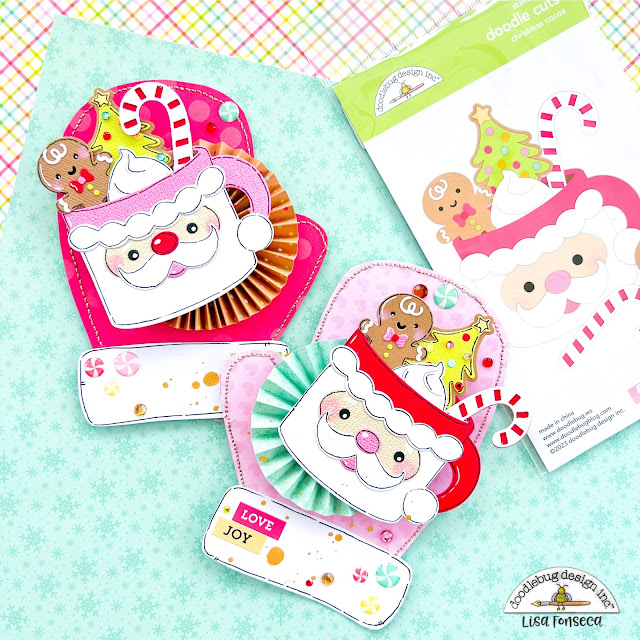
This week I was in the mood for some kind of different crafting. My favorite thing to make are layouts, but sometimes you just want to switch things up. When I saw the cute mug dies from the Gingerbread Kisses collection, I knew I wanted to create some kind of little pockets or gift card holders. 

So that's what I did.


I made these during a workshop day at my house. While the ladies that came to my place, were occupied creating their first layout, I started cutting all of the pieces out. There are quite a few pieces in this die set, but it's relaxing choosing colors and preparing all of the parts. 

I made one traditional Santa and one Santa in pink. I LOVE this color combo and I think it just looks so cool. I really love this die set. 


When I was done with all the pieces, I glued everything together and added a black border, white highlights and pink cheeks to the Santas and gingerbread men.
Then, I drew a mitten shape and cut it out of four different patterned papers. The pink and red ones, called Berry Floral and Christmas Jammies and for the back sides, I used the brown side of Baking Spirits Bright and the back side of Berry Floral. 

Then I stitched both sides together and added the white furry part on the bottom. 
Before I adhered the mugs to the mittens, I created two rosettes out of papers Sugarplums and Holiday Sprinkles. I don't particularly like the process of creating rosettes, but I LOVE the end result and I love adding them to layered crafts.


For some more decoration, I added enamel shapes, jewels and some word stickers.
I also sprinkled gold ink on both of the mittens.


I just love this mug full of happiness and I'm sure I will create more of these... ;)

The bottom part of the mittens is open, so you can put money, a gift card or a letter in there.
I hope you are inspired to create your own little gifts using this die set.

See you soon...

Youtube / Facebook / Instagram


Doodlebug products used:


Gingerbread Kisses collection

Cardstock in different colors


Other products used:


Black pen

White pen

Gold thread

Distress Oxide in pink


Home Sweet home album with Hello Again collection for Doodlebug Design

Tuesday, December 5, 2023

This week, I allowed myself a small break from Christmas scrapping and used the wonderful and one of my favorite Doodlebug collections ever, Hello Again, with the Home Sweet Home house album. 
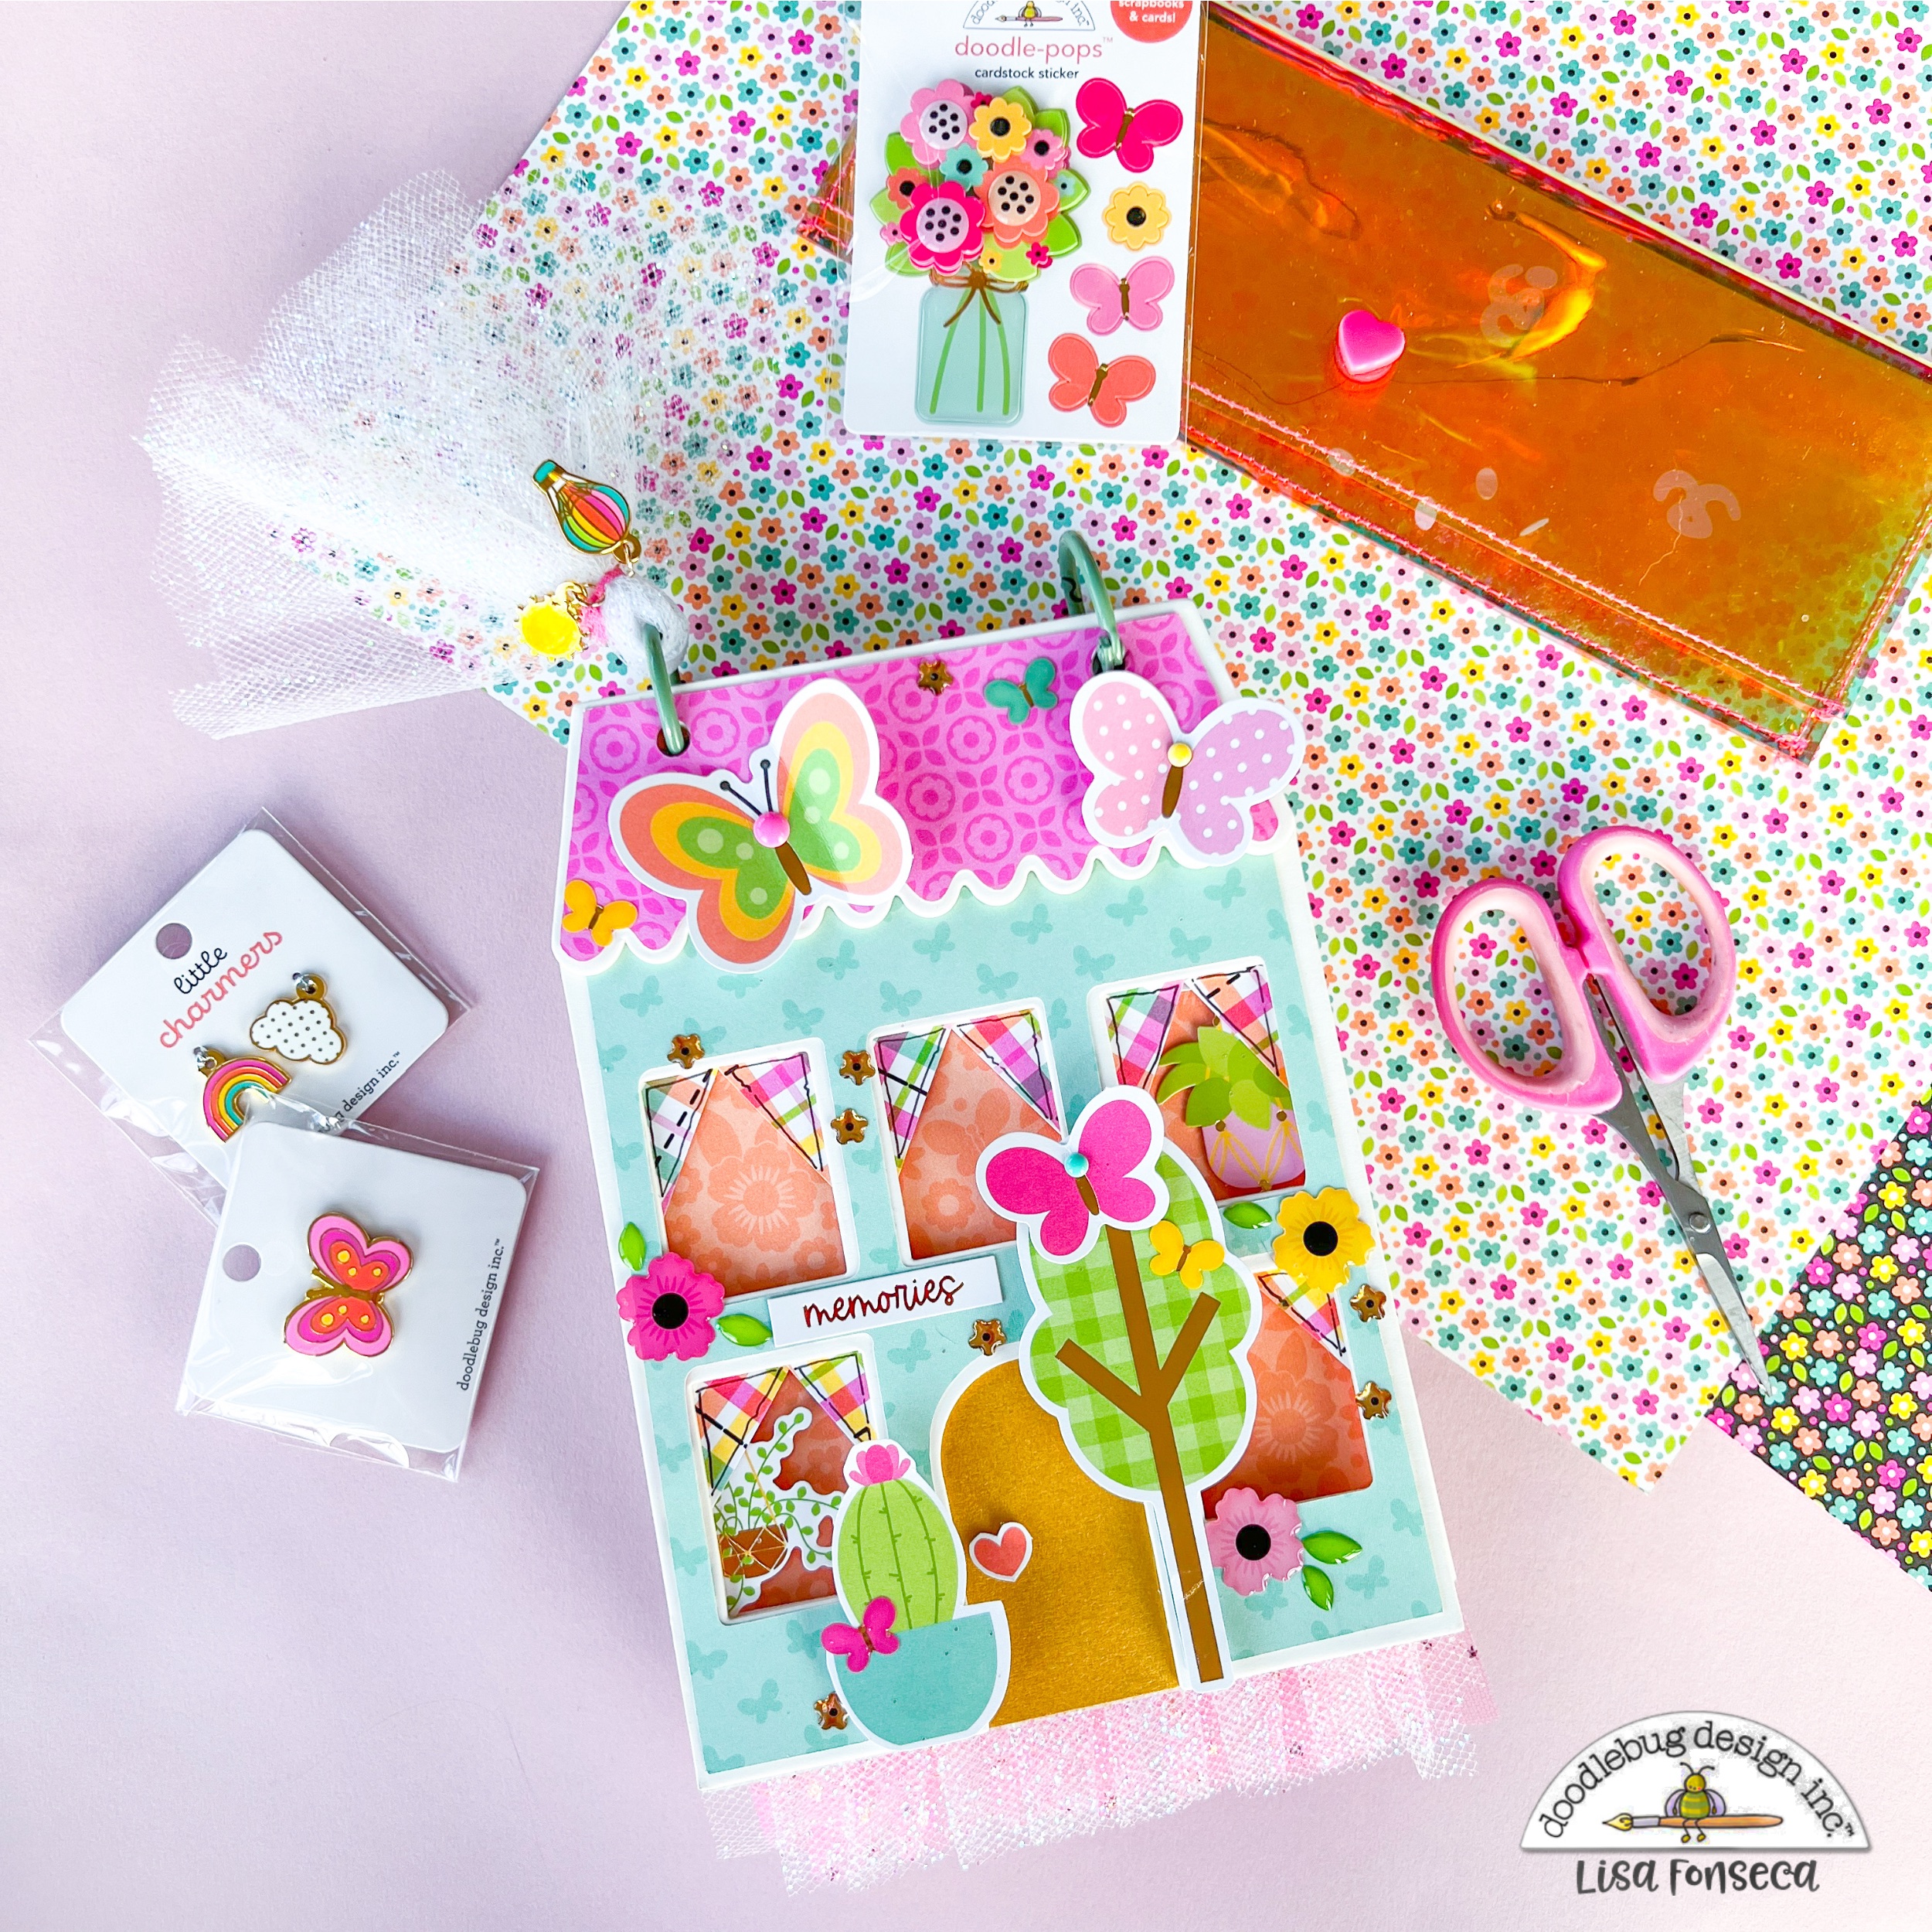

This could be such a cool gift for friends and family that just moved into their new house or to document the first year in a new house or a special occasion that happened in the house. The vibes of the Hello Again collection are sooo happy and fun and like I said a few times already, I LOVE all the gold in it. 


To make the cutting of the pattern papers for the pages easier and faster this time, I created cutfiles and let my Silhouette do the cutting work :) 

For the curtains, I just cut out triangles and adhered them to the back of the windows. I also used hanging flower pot stickers to add behind the windows, looks cute... :) 


As a tassel, I added shimmering tulle to one of the binding rings, (which I replaced by teal ones, btw... :) and I also added two little charms.


Let's take a peek into the album...


Some journaling spots and die cuts...


A piece of the lovely gold dotted acetate...


For the pages of the album, I tried to use a bit of all the kinds of embellishments. I also cut out a page from the acetate sheet with the gold polka dots. 
I love the page with the dimensional butterflies and the pink one with all the stickers around the borders.

I added some tulle on two of the pages, which I think looks so cute. 

I always need to think of leaving some space for the photos, otherwise I would never stop decorating and wouldn't have any pages left for photos... ;)

Try making your own house album, it's so much fun!

See you soon...

Youtube / Facebook / Instagram


 Doodlebug products used:


Home Sweet Home Album

Hallo Again collection


Other products used:


Tulle

Binding rings

Black pen


NOEL - Advent calendar for Doodlebug Design

Wednesday, November 22, 2023
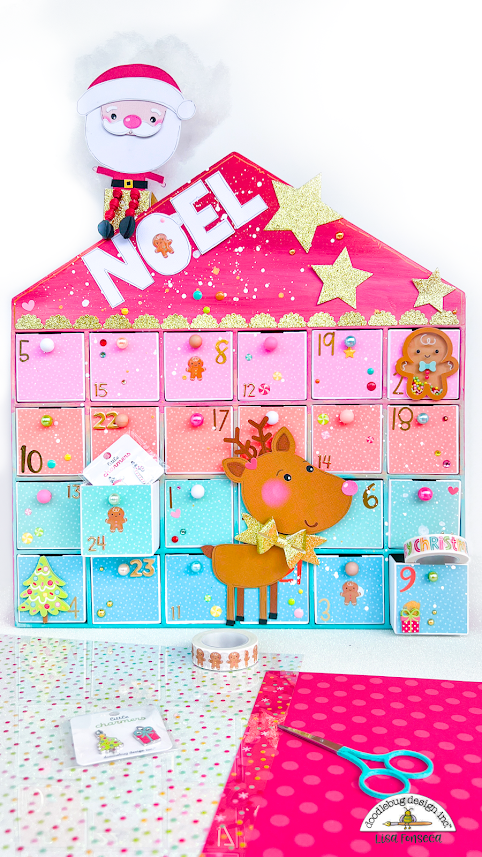
Ahhh... after Halloween, I'm happy to go into the Halloween-Christmas transition phase. I'm not the Christmas-starts-on-Nov-first-kinda-lady, but I'm happy to start creating with a new collection. This time, we got the amazingly cool Advent calendars and I tried to embellish mine as cuuuute as I possibly could... :)


To start and give the whole house some color, I used acrylic paint to paint the whole thing with Christmas colors and an ombre effect. I let that dry and in the meantime, I let my Silhouette machine cut out the parts for the cute Santa and reindeer, I bought in the Doodlebug Silhouette store.

When they were done, I assembled them and added details, like cheeks, highlights, scribbled borders... The reindeer also got a gold bow and Santa got some cute little hanging legs, which I made with paper beads.


I added gold glittery paper around the chimney and also added white and gold splatters to the house.

For my little drawers, I wanted to add knobs, so that you'd open them with knobs instead of opening them through the half-circle hole. 
So I cut squares out of 4 colors of Dotted Petite Prints and adhered them to the little drawers, hiding the hole. Then I used different beads and adhered them with hot glue.


I used Abigail, Alphabet Soup and Sunshine Alpha stickers for my numbers and also added another font in gold using a different brand. Then I added two Doodle Pops, enamel stickers, enamel dots and jewels.


I hand-cut out letters in white to write NOEL on the roof and I also die-cut out big stars in gold to add to the roof too. The last thing was adding a scalloped border, suing the same glitter paper.
And in case, you didn't notice, I also added smoke coming out of the chimney... ;) Cute!


Now, I only need to fill it with the cutest little things from Doodlebug and it's ready to go... :)

Have fun decorating your own Advent calendar! :)

Youtube / Facebook / Instagram


Doodlebug products used:

Advent calendar

Candy Cane Lane collection

Gold enamel dots from Hello Again

Petite Prints dotted in Cupcake, Swimming Pool, Pistachio and Coral

Cardstock

Gold Alphas from Sunshine, Abigail and Alphabet Soup


Other products used:

Beads

Gold Alphas

Gold glitter paper

Fiberfill


Sweet&Spooky mini album for Doodlebug Design

Monday, October 9, 2023

Okay... it's almost October and now we can start talking... crafting Halloween :)

I am a huuuuge fan of the super cute house album we got in our last DT package and of course I decided to create a haunted Mansion album with it using the new Sweet & Spooky collection.
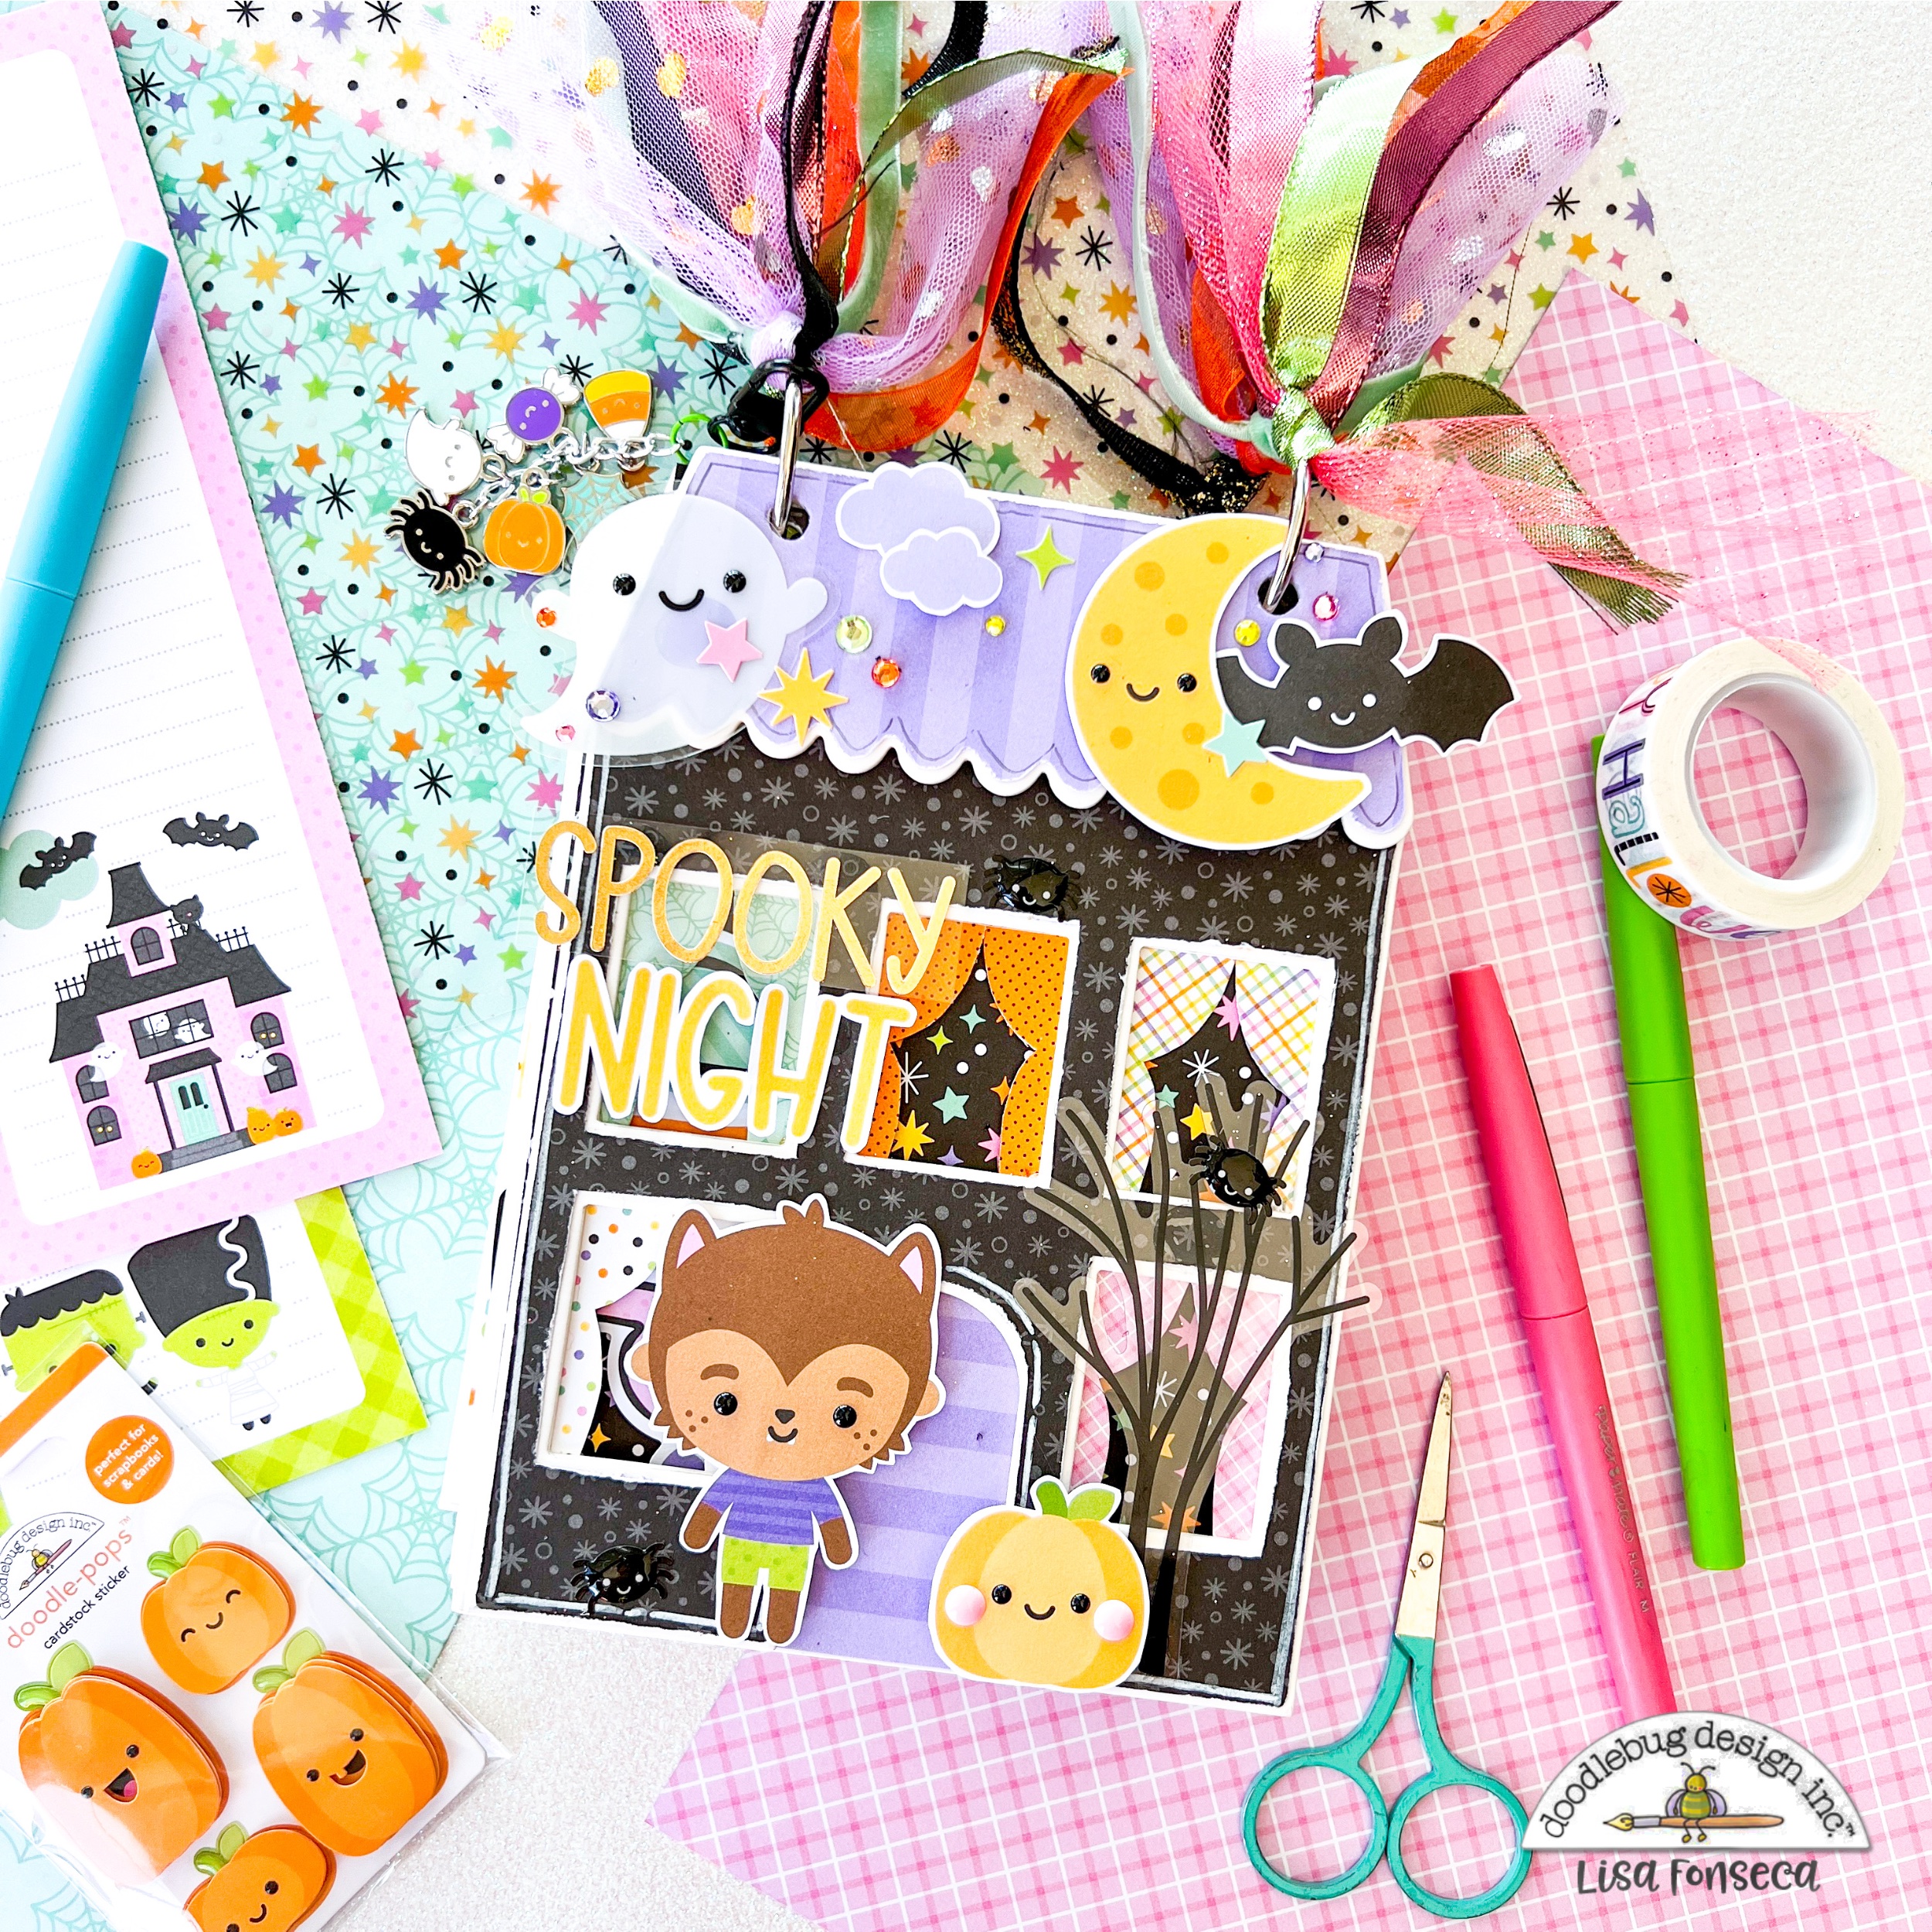

To start, I used almost all of the patterns papers to cover every page of the album. To do that, I traced the house on each paper, using one of the pages as a stencil and then I cut out all of the shapes. I covered each page front and back. 

I then created the curtains to go into the windows by using the stencils included in the album. 

To embellish my cover, I used die-cuts from the Odds&Ends pack. I trimmed the white borders a bit to make them narrower. I used the "An eye for an eye" black sprinkles to add to the eyes of the small characters. I also used some jewels to make it "bling". ;)


To add some extra sparkle and craziness, I added a lot of trim, tulle and ribbon to the binder rings.

I also wanted to create a small dangly-charm-tassel-thingy and I used the super adorable little charms from the collection and some other materials from my stash. Love this new product... the charms are just adorable...


I think the album looks so cute from the outside but it also has a ton of cuteness inside. 

On the inside I decorated each page a bit (or a lot) and I left enough space throughout the album to add photos and little notes. 

Take a look at the inside pages.


A page to write down what you did for Halloween or during the month of October.


A cute little Halloween scene...


A few tags I cut out from the Hello Sugar paper. I added fringes on some of them too...


Loooove the acetate sheet in this collection. It gives the ghost some added decoration and interest and when you lift it up...


... it reveals the little mummy ghost... :)


Some lists I cut out from the Candy Sticks paper and folded to fit the album. You can pull on the little tab...


... open the paper strip and write down your faves! 


The back of the album is very cute too... I added a few stickers and was done!

I wish you all a fun October month and remember to take a ton of photos for your layouts and mini albums... :)

Youtube / Facebook / Instagram


Doodlebug products used:

Sweet&Spooky collection

Sunshine alpha stickers in Gold


Other products used:

Tulle

Ribbon

Trim

Chain

Clasp


Latest Instagrams

© Lisa Fonseca. Design by FCD.