youtube
You make me happy layout for BELLA BLVD
Tuesday, May 12, 2020
Hey friends,
today I'm sharing a layout that is inspired by the BELLA BLVD May mood board :)

I really love this month's mood board, here it is...


today I'm sharing a layout that is inspired by the BELLA BLVD May mood board :)
I really love this month's mood board, here it is...
What I reeeaaallly love on this mood board, is the middle square on the bottom. I'm just in love with the colors, the brush strokes, the way the colors mix and the little details in white and gold. So I really wanted to make a fun, artsy background for my page and I also wanted to include some flowers.
I started with my background. I chose my colors, trying to recreate the color scheme from the mood board. There's no rule to making such a background. I just used my colors, one after the other, painting some strokes of each color and making them blend in some places. At the end, I added the white parts and also some white and black splatters.
I let my background dry and chose a Bella Blvd cutfile in the Silhouette store. I chose this cute cat and cut it out from a gray patterned paper, since my cat is gray. :)
Then I also created three flowers by hand-cutting flower shapes from 3 different patterned papers. I adhered them together, starting with the bigger flower and going smaller. For the center of the flower, I created some wonky-shaped circles in black. I used black to balance the black in the photo and the black splatters. The picture I used, is one of my cat. I printed it in black and white, since I had already enough color going on in the background. I matted it on two different patterned papers.
I laid down all my elements to see how I wanted everything to look like and then I went into my embellishments and chose some pieces that matched. I used some ephemera circles in different colors and I used some puffy stars in two shades of pink. Then I adhered everything on my background, glueing some things directly to the paper and using some foam squares to adhere other pieces.
To finish, I created my title. I chose the word "Happy" from a cardstock sticker sheet. The letters were pink but I wanted something that really popped off the page and I also wanted to come back with more black. So I painted the letters with black ink. To complete the title, I used some black Florence Alpha stickers.
I had so much fun creating this layout and I really like how it turned out. :)
I hope you are inspired to create an artsy background. Just choose a color scheme and brush on some paint. It's very easy and it looks so cool. Also... have you checked out the new Bella Blvd cutfiles?? Soooo cute!!! :)
Thank you for stopping by and see you very soon!
LISA
Sunshine layout for BELLA BLVD
Friday, April 10, 2020
Hey friends,
it's Lisa back on the blog today and I'm sharing a new super fun and bright layout.
The assignment this week was to include creative journaling into the layout. But, we'll talk about that later. Let's start at the beginning.
For my background, I used my new gel press. It's 12x12 inched, so prefect to cover a whole sheet of cardstock. I used my Distress Oxydes and pressed all the rainbow colors onto my press. Then I spritzed some water over the colors and placed my sheet of cardstock on it, pressing it onto the press. That way, all the colors transferred to my page. I let them dry and started creating my sun.
I wanted to create a sun with rainbow colored sun bursts. So I cut out small stripes from almost all of the papers from the 6x6 Bella Besties paper pad. I also used a Bella cutfile (Chicks 301107) to create the two cute chicks. When I had all my pieces, I started placing and adhering the sun and sun bursts down. Then I pierced holes around them and hand-stitched everything with black thread. I didn't do the stitching exactly around my pieces of paper, I wanted to have this cool effect where the lines would be slightly off and I love how it turned out :)
Then I matted my photo with different patterned papers, adhered it next to the sun, using foam tape and then I adhered my chicks, using thick foam squares, to make them stand out the most. I drew some cute details next to the chicks with a black pen and used enamel dots at the end of each swirl.
For my title, I wanted to use some more black to balance out the black of the stitching. I used the Florence alphas under the picture. I also wanted one part of the title to be bigger, so I tried to replicate the Florence font and cut it out from a black Bella Besties paper. I really like how it turned out. :)
Back to the creative journaling. My first idea was to do the journaling on the sun bursts, but when I was done, I realized that it would be hard to write on the small spaces, plus it would maybe ruin the rainbow effect. So I chose to do my journaling around the page, as a frame. I wrote my journaling on a white scrap of paper, cut it into small strips and adhered the text all around.
To finish the layout, I splattered some pink ink, used some flower stickers from the Squeeze the Day collection, and I was done!
I really hope you enjoyed the process and like the layout.
See you very soon,
Lisa
Splendid Friends - HIP KIT CLUB
Wednesday, November 13, 2019

Hey friends,
today I'm sharing a very fun and colorful fall wreath I created with an exclusive October HKC cutfile. 😃
I chose the leaves cutfile because I love making wreaths. I cut the leaves out of different colors of cardstock from the Cardstock Kit. Then I slightly changed the cutfile, so that I would only have the contoures of the leaves. This way I could back my leaves very fast without having to hand-cut everything. I used different patterned papers to back the leaves. What I love about the colors is that they are very bold and saturated and I also love having some brown, which, let's be honest, we almost never use on our layouts... 😄
I added the title, some enamel dots and some exclusive embellishments and I was done!
Let me know if you like it, see you soon! 😘


Fall cards - HIP KIT CLUB
Monday, November 11, 2019

Hi friends,
today I'm sharing three cards I made using the October kits. 😃
The assignment was to get out our punches and also add some stitching details. I had only received a new flower punch and was excited to try it out. I created flowers for the three cards, switching between colored and white ones.
I adhered the white ones to a pretty colored patterned paper and for the colored flowers, I used papers with less colors and patterns, to make them stand out more. I used a lot of the exclsuive HKC vellum and acetate flowers which I LOVE!! I want to add them to everything... haha! I added some hand-stitching details to some of the vellum leaves, which looks pretty cool!
I adhered the white ones to a pretty colored patterned paper and for the colored flowers, I used papers with less colors and patterns, to make them stand out more. I used a lot of the exclsuive HKC vellum and acetate flowers which I LOVE!! I want to add them to everything... haha! I added some hand-stitching details to some of the vellum leaves, which looks pretty cool!
I really hope you like them and and inspired to create flowers too! 😘🥰☺️
Thanks, Lisa
Thanks, Lisa
P.S. Have you seen the cute fox head which fits perfectly on the fall sweater die-cut?? So cute 😁


Fantastic layout for PINK PAISLEE
Wednesday, March 13, 2019

Hey scrappy people,
it's Lisa back on the blog today, sharing a layout I made using the brand new Paige Evans collection called Horizon. I really love every Paige collection, but I have to admit, with Oh my Heart, this is my favorite collection of them all. :)
Here is what I created...

I wanted to make a layout where I could showcase a lot of those beautiful patterned papers in rainbow colors. So I chose one of Paige newest cutfiles where I could back each letter with a different patterned paper. I used papers with very small patterns that can almost count as solids.
I started by tracing each letter on the papers and cut them out. I didn't want to back the cutfile in the usual way though, I wanted the cutfile to sit on the letters a little crooked. So I attached the letters to another one of the patterned papers and the I placed the cutfile on top. I stitched over each letter of the cutfile with color matching thread to give more interest.

Haha... don't look at some letters too closely, the stitching machine is a bit complicated and not that performant and I'm really not the best at machine stitching... ;) I don't think it matters though, I love that it's not really perfect.
I also used a 3d flower cutfile from Paige to create some flowers with matching colors. I placed the flowers next to the letters with the same color.

I also added some ephemera flowers next the 3D ones. The flowers of this collection are EXACTLY how I love them... I will need at least 20 packs of ephemera... :)
I also wanted to add leaves to the flowers, but using more patterns and colors would've been too much. So I cut them out of white paper and traced around them with a fine gold pen. Then I added them to some of the bigger flowers. I matted my pictures on some scraps of paper and added them too.

Since you couldn't see the word of the cutfile 'Fantastic' very good anymore, I wanted to include it again. I hand-cut out letters from matching patterned papers, adhered them to white paper and cut the word out, leaving a white border. Then I adhered it to the layout, adding also the word 'women' with tiny foam thickers.
To frame the layout, I used a few of the washi tapes from the collection. I ripped random pieces of them and adhered them to the borders of the page.

Finally, I added some white splatters and I was done!

Thank you so much for being here! :)
Yay layout for HIP KIT CLUB
Tuesday, February 26, 2019

Hi friends, it's Lisa back on the blog today.
My assignment this week was to make a layout featuring frames, hearts and flowers. Since I'm not a minimalistic scrapbooker and I had already used the frames and most of the hearts included in the kits, I had to improvise a bit. :) But this is what I came up with!
So to start I chose the papers (Main Kitand Color Kit) I wanted to use together. Then I cut out different and random sized rectangles. Bigger ones and smaller ones. I chose the ones that I was going to use as frames and cut out the centre of them with my exacto knife. Then I placed them on my white sheet of paper and started arranging the rest of the pieces in front and behind of the frames to create this random geometrical grid design.

I wanted to include more flowers than hearts in my layout, since I already made a layout with a lot of hearts the week before. But I didn't really had any flowers left in my kits, except that one project life card (Project Life Kit) with tiny pink flowers. So I fussy-cut those out but also needed bigger flowers. So I decided to use a stamp and die set from Vicki Boutin we got a few months back in the color kit.
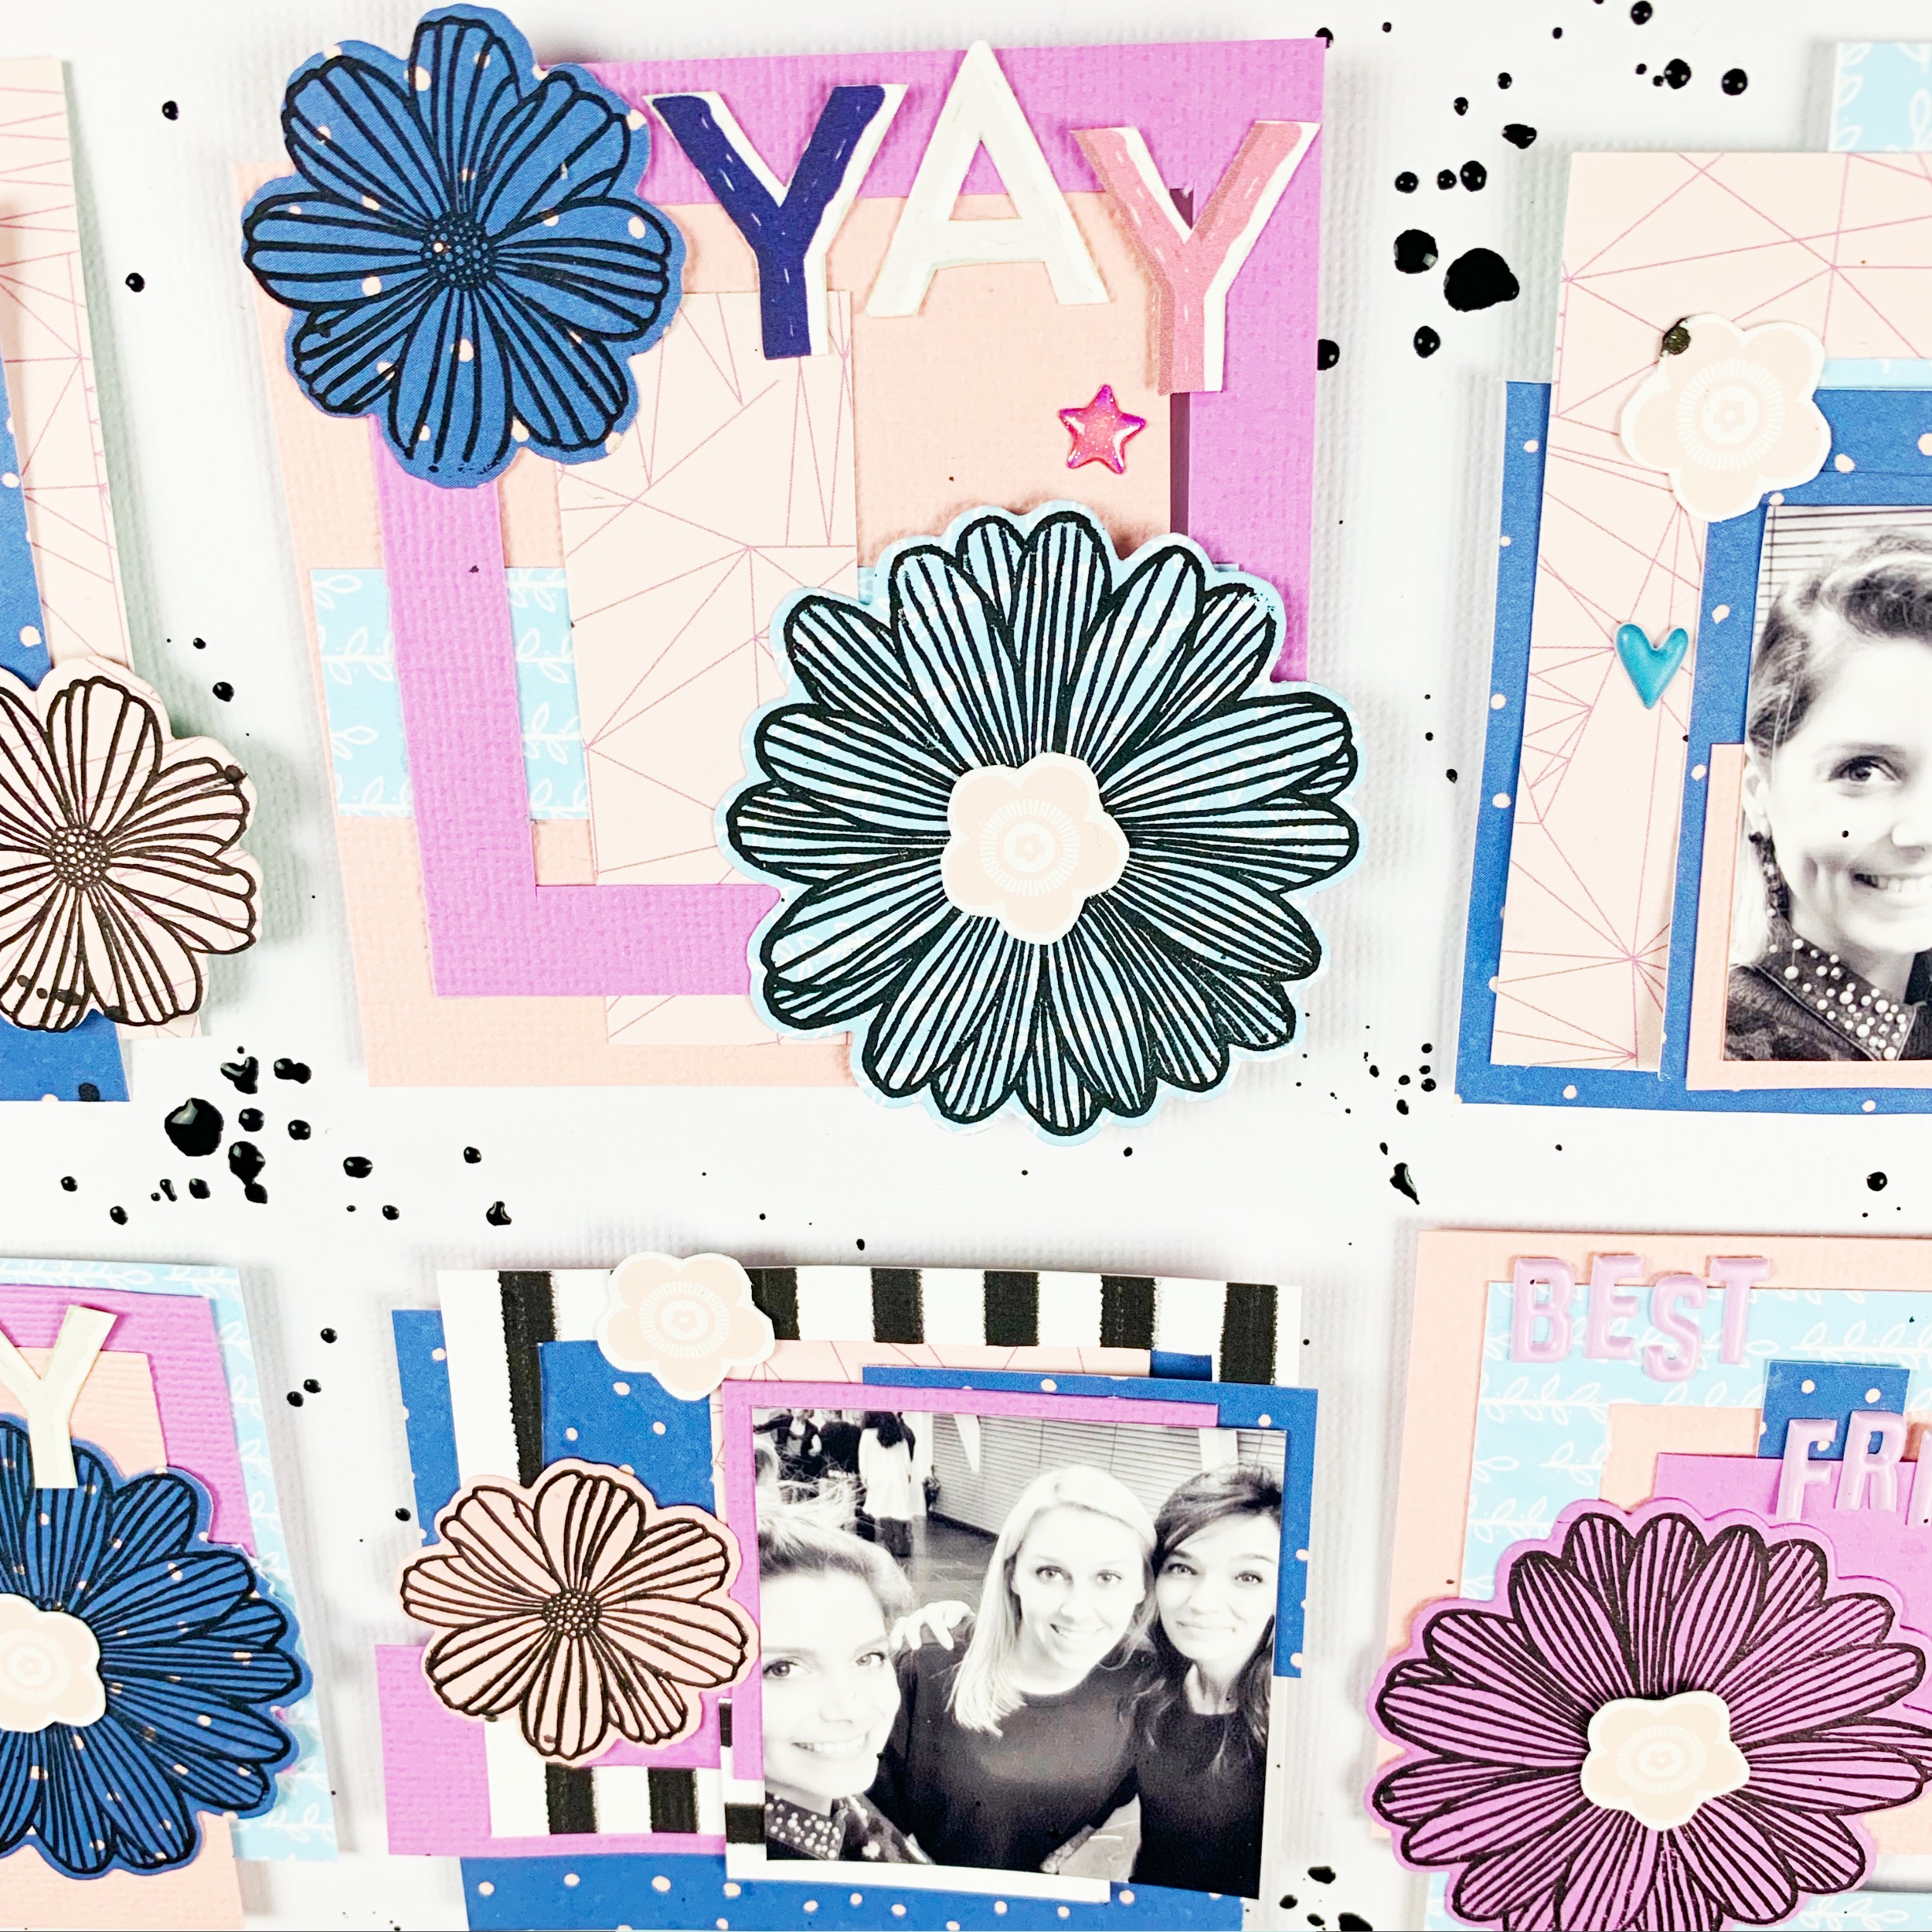
I stamped some big and smaller flowers and cut them out using the matching dies. Then I arranged them on my layout. I also put one of the fussy-cutter pink flowers in the centre of each bigger flower.

I really love how those blue flowers turned out, because they have these tiny pink polka dots all over... really cute :)
As a title, I fussy cut out three "YAY's" out of a Crate Paper patterned paper (Main Kitand Color Kit) and arranged them on the layout. I also used the Pinkfresh studio tiny alpha stickers (Project Life Kit)to write "Best friends" and "Love you".

I had two matching hearts left from the Pinkfresh Studio layered hearts (Embellishment Kit). I took off the little banner on top and also incorporated them in my layout. To finish, I used some more embellishments that matched, like the Shimelle enamel shapes (Main Kit) and the Pinkfresh studio puffy stickers (Embellishment Kit). Some black splatters as a final touch and I was done! :)

I hope you like how the layout turned out! :)
Thank you so much for stopping by!
'Lovely smiles' layout for PINK PAISLEE
Wednesday, February 20, 2019

Hey there scrappy friends,
I'm back on the blog today, sharing this layout.

For this layout, I created my own cutfile. I designed a wreath in the silhouette program, made of hearts and stars and flowers. To cut it out of, I used one of Paige Evans' patterned papers from the Whimsical collection, the one with the rainbow stripes.

I wanted to do a little mixed media on the background before placing the wreath on it. First I put some white gesso on the whole sheet of paper, then I took some Distress Oxides and put down some color being careful to use the same colors as on the wreath.
When the machine was done cutting the different shapes, I started adhering the shapes unto the page. To help me do this, I used the paper the shapes were cut out of, as a stencil.

Then I cut off the edges of the white paper and placed it on that same rainbow patterned paper to create a matching border.
To embellish and make the wreath look more full and rounder, I used some rub-ons, enamel shapes, cardstock stickers, chipboard stickers and punched-out hearts.

I matted my picture on some scraps of patterned papers and adhered it to my page. Next to it, I used an ephemera piece and some mini foam stickers to create my title.

To finish the layout, I splattered some paint around the wreath, using the same rainbow colors.
I hope you like how it turned out and are inspired to create your own cutfile for your next project! :)
Lisa
12x12 layout
American crafts
Lisa Fonseca
paige evans
pink paislee
scrapbook
scrapbooking
whimsical
youtube
Whimsical mood layout for PINK PAISLEE
Thursday, December 27, 2018

Hi scrappy friends, today I'm sharing one of my favorite layouts I ever made for Pink Paislee. When I look at it, it makes me so happy... ;)

When I sat at my desk to start a new layout, I had no idea what was going ti happen. Usually I have an idea or a cutfile I want to use, but here, I had nothing at all. So I just sat down and went through all the Whimsical stuff hoping that something would catch my eye and give me a fun idea. And it did...
I decided to use the 2x2 paper pads in a grid design. It's not really a new idea, so in some way, I scraplifted myself in this layout, because I already made a layout like this with the Turn the Page collection and the Pick-me-up collection.

But this time, I wanted to create a rainbow design with the colors of the papers. So first, I went through the 2x2 paper pads and chose all the ones I thought I could use. I arranged them on my desk to see how many squares of what colors were missing. Then I went through my patterned papers and cut little squares from different colors.
When I had my 25 squares arranged and ready, I distressed all the edges with my scissors. Then I chose 2 squares of each row and sewed the borders on half of them and some zig-zags on the other half.

Then I adhered all the squares, using thick foam squares to make all of them pop off the page. Of course, I had to have my border around the page and for that I used the hexagon paper.

I fussy-cut a bunch of flowers from the beautiful floral paper, used some ephemera florals and also some stickers and created flower clusters on each row, matching the colors. I also added a matching cloud to every row, some hearts and word stickers.
When I started the layout and had all my squares stuck down, I really wasn't sure if I was going to like it, but at this point, I was like: Oh, yes!!! :)

The final touch that made me REALLY love the layout was the title. I didn't want to use the chipboard thickers from the collection because I thought they would break the structured style of this layout and the mini foam thickers were too small on their own. So I decided to hand-cut my own letters to write a title. I couldn't adhere them to the squares as is though, because they wouldn't have popped out the page. So I attached them to some white scrap of paper first and cut out around them, leaving a white border. Then I placed my title below the picture. Some white splatters later, I was done! :)

Thank you so much for being here,
Lisa
12x12 layout
American crafts
cutfiles
Lisa Fonseca
paige evans
pink paislee
scrapbook
scrapbooking
whimsical
youtube
Pretty in flowers layout for PINK PAISLEE
Saturday, December 22, 2018

Hi lovelies,
I'm back on the blog sharing this fun layout with you.

When we got all the products from the Whimsical collection, this speciality paper immediately caught my eye. I love that it was included in the collection, since it was very different from what we usually get and since it was so interesting to try to figure out how to use it.
Of course, you can use it as is and there are a lot of people who did this and the layouts turned out beautifully, but in my head, I already had the idea to cut up the flowers and try to create my own bouquet.

So to start, I chose a colorful paper from the collection that I would use to back the speciality sheet. With that paper, all the parts would have different colors without me having to chose different papers and backing every piece on its own. When everything was adhered, I cut out all the pieces leaving a thick border.

When I had all my pieces, I wanted to add some details. So I went into my stash of thread and stitched through the middle of the leaves and did a bunch of little french knots in the middle of the flowers. I think that this turned out so cute and it added so much to those flowers and leaves.
As a background, I chose this suuuuper adorable mini heart paper. This was my favorite paper from the beginning and I absolutely wanted to use it as a background, it's so pretty!!

I chose a picture I took in vacation last June, matted it with some scraps of patterned paper and placed it on the layout. Then I gathered all the flowers and leaves between the bottom right side of the page and the picture.

As a title, I used an ephemera piece and the thickers from the collection. Then I splattered some gold color shine and I was done! :)
Thank you so much for stopping by :)
12x12 layout
American crafts
Lisa Fonseca
paige evans
pink paislee
scrapbook
scrapbooking
whimsical
youtube
Create, craft, repeat layout for PINK PAISLEE
Sunday, December 9, 2018

Hi scrappy friends,
it's Lisa back on the blog today and I'm sharing this super cute unicorn layout, that I've been so impatient to share.

I've been wanting to use those tiny brushes and color tubes and scissors since I got the Whimsical collection. But I'd never had the right idea until now.
I'm a kindergarten teacher and at the beginning of the year, I bought some clipart that had all those cute little unicorns with different school materials. It also had this one that's holding a palette and a brush. When I was preparing class stuff I remembered it and thought that it would be perfect to use as a cutfile. In fact, the lines of the drawing are so thick that it makes a perfect cutfile and I was so happy when I saw the result :)

So to start, I backed my cutfile as usual, using unicorn-matching colored papers from the Whimsical collection and this adorable blue and gold grid design paper from the Oh my Heart collection. It was so fun backing the unicorn's shirt with it because it looks very fancy in it :) I also added some details with a white pen, like little dots and reflections on its eyes.

When the unicorn was ready, I prepped my white 12x12 paper with splotches and splatters of yellow and pink paint. Then I added the unicorn. Next to it, I adhered my picture. I used a picture my boyfriend took just moments earlier, of me creating the unicorn :) I matted it with scraps of the same papers I used for backing the cutfile.

I cut off the edges of the entire page and adhered it to a the colorful hexagon patterned paper so that it would create a colorful border. I also stitched all around the edges.

As a title, I used a chipboard sticker and both kind of thickers from the Whimsical collection.
Then I went through all the embellishments to find all the little items that would match. There are chipboard stickers, cardstock stickers, puffy stickers and enamel shapes. To put a final touch to the layout, I splattered some gold color shine.

I hope you like it and thank you for stopping by! :)
Subscribe to:
Posts (Atom)